
Preserving the Harvest (2)
In the last issue, I talked about different ways to preserve food, from storing, canning, and drying to making jams and pickles. All of these methods serve to preserve food for later use to sustain the body. However, there is only so much jam and cake you can make with excess fruit. But, hey, there is still something else you can do!
Traditionally, any excess fruit is distilled to yield fruit brandy. The Black Forest, for example, is famous for its Kirschwasser, but there are dozens of similar fruit brandies made from plums, raspberries, bilberries, pears, apples, apricots – you name it. But as home distillation is illegal in many parts of the world, we won’t go into it here.
Wine-making
Winemaking, on the other hand, is not illegal. Wine experts may scoff at such peasant brews, fruit wines can be excellent, highly idiosyncratic, fun to make, and inexpensive. One just has to abandon any preconceived ideas of what wine should taste like. If you enjoy experimentation, winemaking opens up a whole new universe of hitherto unimagined possibilities.
The process of winemaking is simple enough. It involves the straight forward process of converting sugar to alcohol and CO2, using the ‘bio-services’ of yeast, which does all the work. (Sorry, wine-making is not CO2 neutral.)
There are gazillion different recipes for just about any fruit or vegetable imaginable. But grapes are considered ‘ideal’ in terms of the balance of acids and sugars. They require little or no adjustments. The most difficult aspect is the measuring process used to calculate the acid/sugar/ and potential alcohol content of the resulting brew. That is if you are going to get technical about it and expect to have some control over the result. Good wine does not happen by accident (although it may). When making wines with other fruits the wine-maker periodically takes a sample to measure the acid and sugar levels and makes adjustments accordingly.
Beginners often find it confusing that there is no general method that applies to all fruit. Each is considered for its own specific merits and treated accordingly. Although when just starting out one tends to want to follow a tried and tested recipe blindly, it ultimately will be to your advantage to learn about the chemistry involved so that you can make your own decisions based on your specific measurements.
Hot summers produce sweeter fruits than cold and rainy ones. Personal taste also comes into play. Some prefer a lighter, fruitier wine while others like a heavy, full-bodied one. As in all food ventures, the better the quality of the source materials you use, the better will be the result.
Basic Method:
- Select and prepare the fruit: take off stalks, remove large stones
- Transfer to a bucket and bruise/mash
- Add water (the flavor would be too strong if left undiluted)
- Add other flavoring agents, such as ginger or raisins
Many winemakers add Campden tablets at this stage for the purpose of sterilizing the brew. Others just add the yeast and allow nature to run its course. Whichever method you follow, the important thing is not to add yeast and Campden tablets at the same time as this would destroy the yeast.
After adding the yeast, leave the mixture to ferment, but cover the container. This primary fermentation usually takes approximately 3 – 7 days.
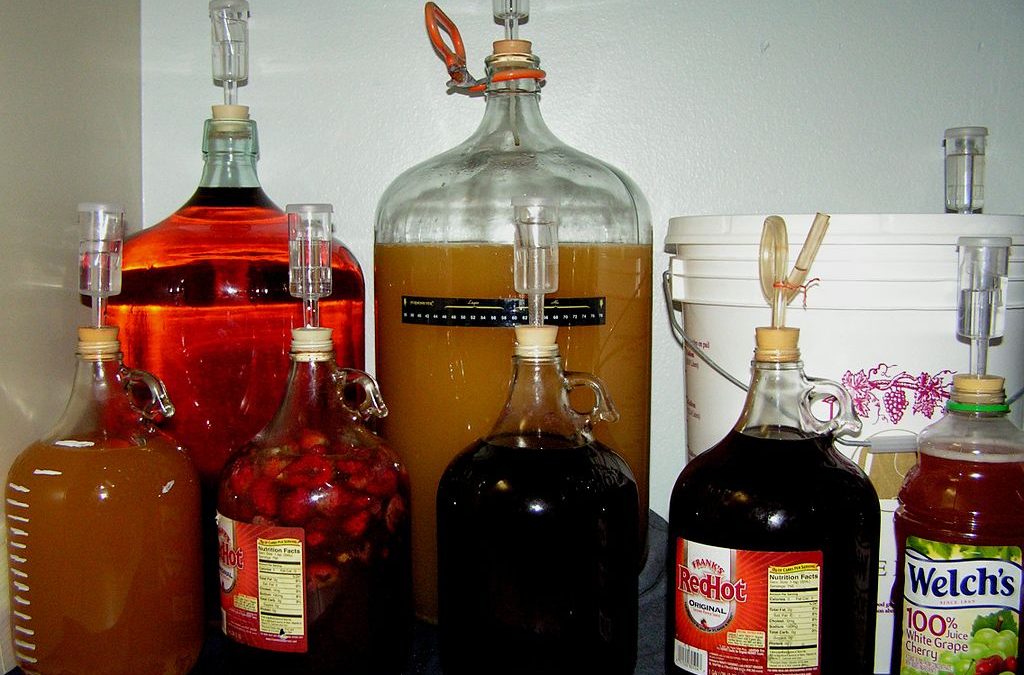
Siphon the liquid off by transferring it to a demijohn. Bung with an air-lock to prevent oxygen from entering. Fill the demijohn to the top. Check the sugar/acid content and make adjustments as needed. Let it ferment for a further 4-6 weeks.
Avoid opening the demijohn unnecessarily so as to minimize exposure to air, especially in the beginning when the alcohol content is low. But if the fermentation process slows down too soon, test and if necessary, feed it with additional sugar.
When the right alcohol/acid/sugar balance has been achieved, the liquid is siphoned off, filtered and filled into bottles. After 6 months to 1 year, the wine will be good to drink.
Winemaking is not complicated. But if you want really good results you have to invest in a range of tools and equipment and learn how to use them. You also need enough room to store the materials and the demijohns. But the satisfaction and sense of discovery derived from it are absolutely worth the effort. Just don’t expect your wine made from Bananas to taste like a Chardonnay. And, be patient!
It would go far beyond the scope of this article to describe all the tools that are necessary to get started or the additives that may improve the quality of your wine. Join a wine-making forum to discuss your projects and learn from others who are also practicing this fine art. Below are some links to pertinent pages and forums:
Liqueurs
This kind of sweet, alcoholic ‘dessert’ is easy to make and quite delicious. Macerate the fruit or herbs in a strong alcohol base such as Vodka, for several weeks. Remove the fruit and add sugar or spiced sugar syrup. Fill into glass jars and allow to stand for several months more – the longer you leave them the better they get.
Rumtopf
This is a great way to preserve excess amounts of fruit. And what sweet memories it of the summer past it will bring with when you dig into it in the winter.
Rumtopf consists of fruit, sugar, and rum. It is basically a collection of seasonal fruit preserved in and macerated in sugar and alcohol. Traditionally, it is started with the first soft fruit of the year – usually strawberries. Remove the green bits but keep the fruits as ‘whole’ as possible. Place a layer of fruit into the rumtopf (a tall earthenware pot), then cover it with a layer of sugar (equal amount in weight). Finally, add rum to cover the fruit with about 1inch of alcohol. Place the lid on top and leave in a cool, dark place. Every month a new fruit is added following the same procedure. Strawberries, cherries, currants, gooseberries, raspberries, peaches, plums, apples, pears – whatever you fancy. Most people prefer to make a batch for red fruit and a separate batch for yellow fruit or use red fruits only. By Winter Solstice you will have a lovely jug full of highly potent fruit that makes a very warming condiment for ice cream or other desserts.
Elderberry wine
- 3 lbs fresh elderberries
- 3 lbs sugar
- 8 pints of water
- 1 teaspoon citric acid
- Wine yeast
Clean and strip the Elderberries from the bracteoles (can be done with a fork) and remove all green parts. Place in a bucket and bruise the berries to release the juice. Boil the water and pour half of it over the berries. Set aside until cool. Dissolve the sugar in the rest of the boiling water and strain the berries through a sieve on to the sugar. Add the lemon juice and the yeast (the liquid should be warm, but not hot). Pour the liquid into a demijohn and seal with an airlock.
Keep the wine in a warm place and allow the fermentation to run its course. When the bubbling has ceased, siphon the wine into a clean jar, a process that winemakers call ‘racking’. This is done to remove any sedimentation (known as ‘lees’). Store the demijohn in a cool place and rack intermittently until no more sediments form. When the fermentation has ceased completely, there are no more sediments and the specific gravity is 1000 or less, the wine is ready for bottling.
Green Walnut Liqueur
- 750 ml fruit brandy
- 500g brown sugar
- 1 Vanilla bean
- 3 inches of crushed Cinnamon stick
- 3-5 star anise, roughly crushed
Pick about 30 green walnuts (traditionally on St. John’s Day / 24 June) while they are still soft. Cut into slices and place them into a wide-mouthed jar. Pour 750ml of fruit brandy, or eau de vie over the nuts and macerate for 4-6 weeks. Strain and discard the nuts. Prepare a syrup with 500g of brown sugar and 500ml water. Scrape the inside of the Vanilla bean, and add to the syrup along with the crushed Cinnamon and the Star Anise. Simmer for 5 minutes. Stir in 1 teaspoon of Cocoa powder and the juice and zest of 1 organic orange. Set aside to cool, then mix with the walnut filtrate and fill into jars (Kilner jars). Allow macerating for at least 3 months. Filter and bottle.