Plant Profile: Walnut

Plant Profile: Walnut

Walnuts (Juglans regia)

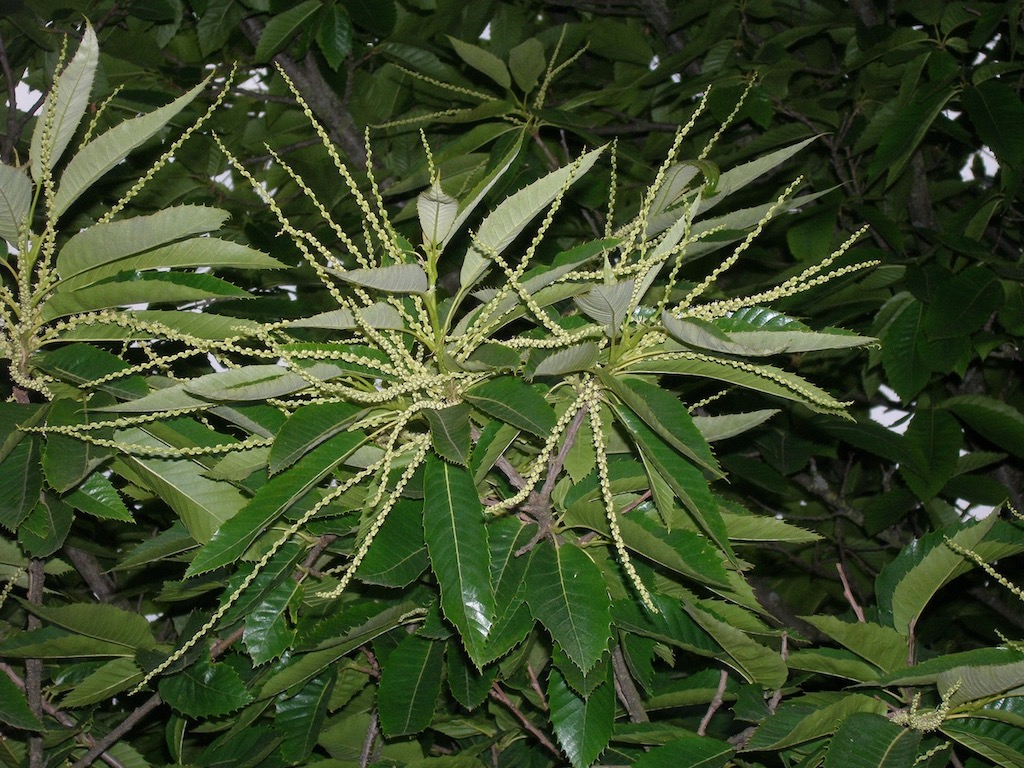
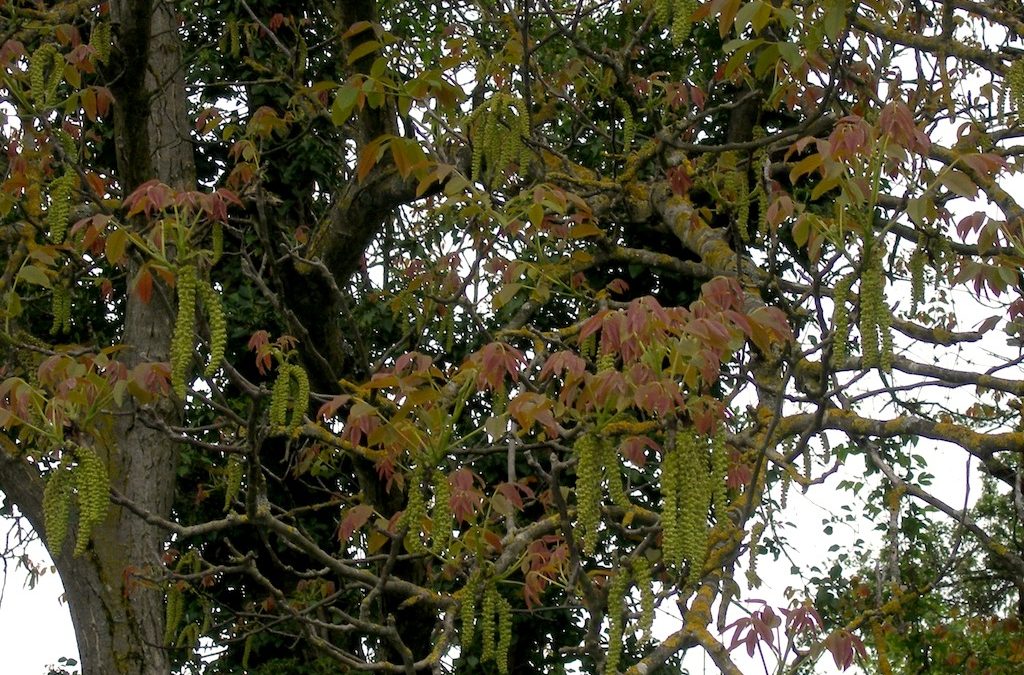
It’s ‘nutty season’! (No, I don’t mean politics, in this case) I have was reminded of the fact by the intermittent popping noises coming from outside my window and by the mass of fuzzy hazelnut balls that are piling up on the front porch. These Turkish hazelnuts are plentiful, for sure, and easy to collect. But they are small and extremely tedious to crack. Thankfully, nature provides plentifully and these are not the only nut trees around. We also have some Walnut trees – English Walnuts, that is! Majestic to behold, Walnut trees, are among my favorite trees, and seeing them laden with nuts is a joy.

The ‘foreign tree’

Walnut trees (Juglans regia) are well integrated foreigners in our northern latitudes. Their home is in the warm, and fertile regions of south-east Europe, northern Greece, northern Italy, and France, where they are widely cultivated. Walnuts reached the ‘Low Countries’ north of the Alps in the pockets of Roman soldiers. But, it took several centuries before they really made themselves at home. Teutonic tribes, who gave them their name, apparently regarded them as an oddity, which is expressed in the name they gave the tree: ‘Walnut’ is derived from the Germanic word ‘welsh’, meaning foreign.

They did not reach Britain until the 16th-century and are only found in the warmer, southern parts. The Roman nut became known as the ‘English Walnut’, perhaps to distinguish it from the American walnut (Juglans nigra), or the Pecan nut (Carya illinoinensis). So, it seems this ‘foreigner’ has not only well adapted to its new home but has also been adopted by the locals, who think of it as one of their own.

A southerner in northern climes

Although in time walnuts adapted quite well to the much harsher northern climate, their southern origin becomes evident in spring. Despite the fact that they come into flower quite late (April), they remain vulnerable to late frosts, which can quickly ruin the prospects of a good harvest.

A generational tree

In previous centuries, walnut trees were considered so valuable that they were specifically itemized in the will. A productive grove could cover a good part of a family’s livelihood. But that aside, planting a walnut orchard was an investment in the future: walnut trees are slow to mature. Although they start to produce nuts from the tender age of 15 years, they don’t become fully productive until they have reached the age of thirty. A mature tree produces about 50kg of nuts per year.

The American Cousin

The American (Black) Walnut is quite a different fellow. They are native to the US and occur wild throughout the eastern United States. However, they are not as well-loved as the ‘English’ variety, since they have the rather unsocial habit of emitting a chemical from their roots that inhibits, and eventually kills other plants in its vicinity.  Besides, they are incredibly hard to shuck. People report placing them on their driveways and driving the truck over them in order to crack their shells. Crows & co have picked up on this trick. The birds strategically place nuts in the flow of traffic (e.g. at stoplights) in order to enlist our help in cracking the nuts.

Foraging

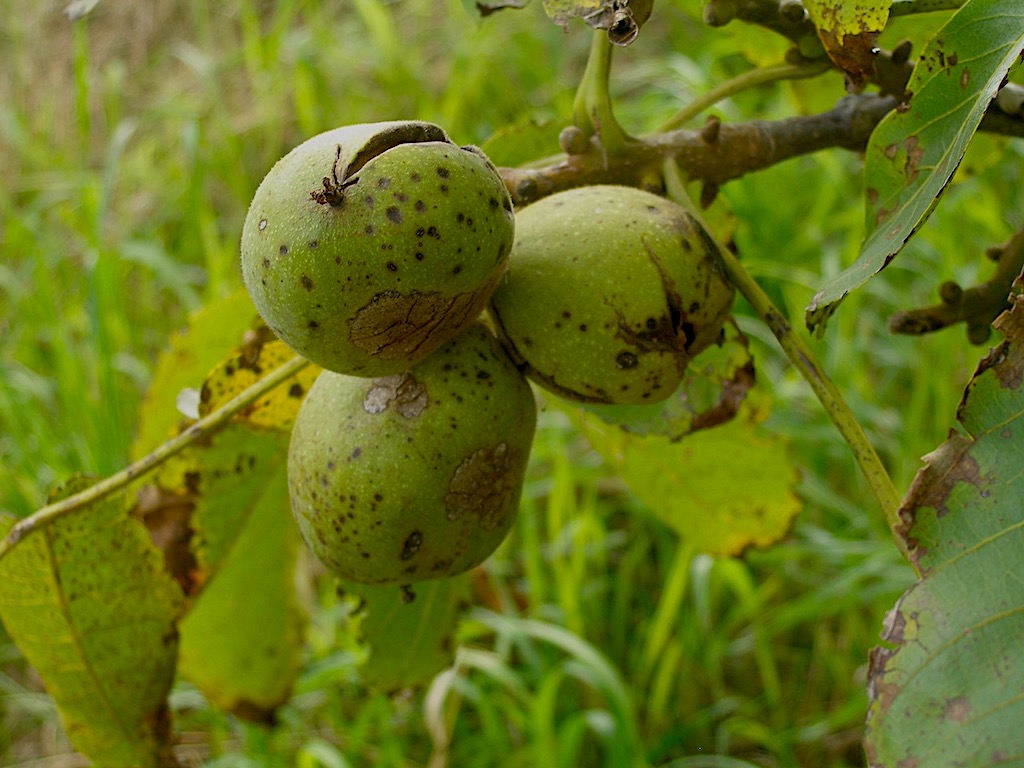
In a good year, a mature walnut tree is laden with nuts, which begin to fall in late September/early October, depending on your growing zone.

The nuts are covered by a hard, green hull that is exceedingly difficult to remove and besides, will stain your hands, clothes, and work surface.  Wear gloves, if you don’t want your hands to look like you have been chain-smoking. It is best to harvest the nuts when they are fully ripe, at which point the green cortex will split open to reveal the nut inside, or sometimes it disintegrates into a black mush, leaving the nut behind.

Remove the black stuff as much as possible. It is very high in tannin and can affect the quality of the nut inside. Once you have removed the outer cortex wash the nuts. Put them into a bucket of water. This will naturally separate the good ones from the rotten ones. Bad walnuts tend to float, while the good ones will sink.

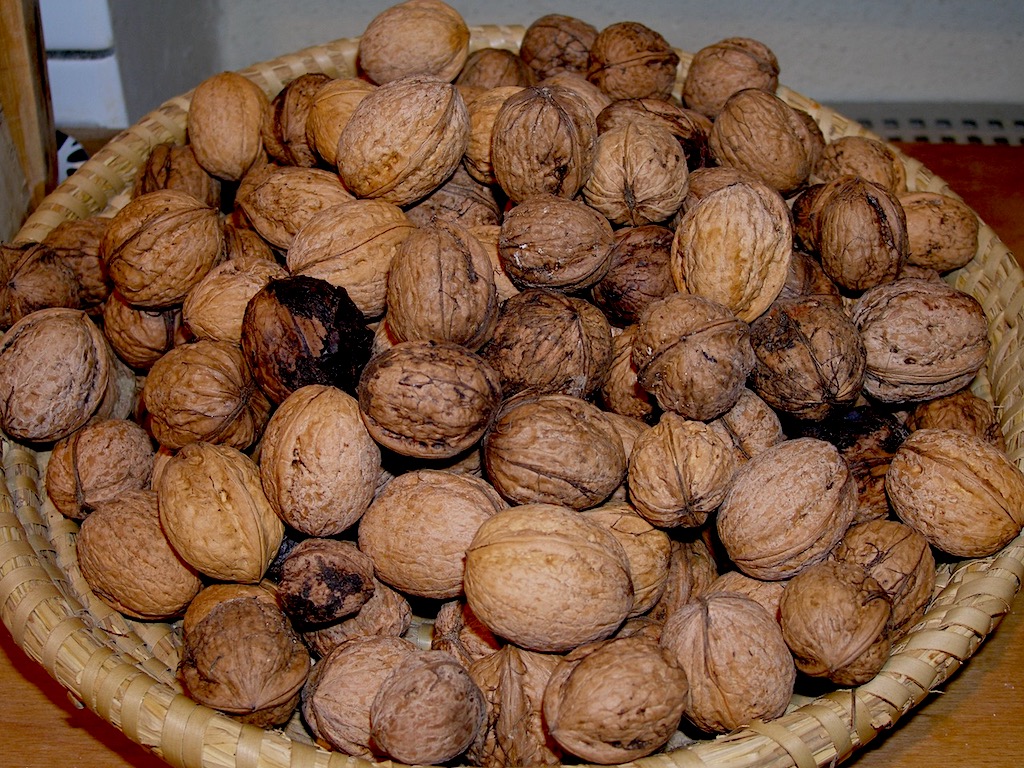
After washing the nuts, you can either shuck them or dry and store them for later use. If dried and stored properly, walnuts can keep for a year. Shucking exposes them to oxygen, which will cause them to turn rancid more quickly, due to their high levels of unsaturated (as well as saturated) fats. Keep the nuts in a cool and dark place where there is no danger of worms or vermin looking for a free lunch.

American Walnuts are much harder to crack than English walnuts. It is said that soaking them in water for 8 hours prior to cracking makes the job much easier. For English Walnuts, this is not necessary. They readily succumb to the persuasive powers of an ordinary nutcracker. Black Walnuts need a more forceful treatment.

Walnuts are very rich in oil – 2 kg of nuts will yield about one liter of oil. which is considered a delicacy. It is not so easy to obtain from your foraged nuts, though. Native Americans are said to have boiled the nuts to extract the oil. But this also destroys some of their nutrients.

Walnut oil has a delicious nutty flavor and is excellent in salad dressings or home backing to impart a delicate nutty flavor.

Most of all, forager appreciate walnuts for their delicious ‘meat’, which can be used in both sweet and savory dishes. (see recipes below)

Medicinal uses

The soft kernel on the half-shell vaguely resembles a brain, surrounded by the protective cover of the cranium. The ancients took this likeness to mean that the nut must be good for the brain.  (according to the doctrine of signatures). Scientists have confirmed that walnuts are indeed beneficial for the brain. This is due to their nutrient content, and especially the omega-3 fatty acids (of which walnuts are a rich source). Omega-3 fatty acids support the body when it comes to dealing with stress and is said to help alleviate depression. (see https://www.health.harvard.edu/blog/omega-3-fatty-acids-for-mood-disorders-2018080314414)

Native Americans have used various parts of the tree, not just for food, but also as medicine. The leaves and root bark was used in anti-parasitic preparations and to treat skin diseases. The root bark is very astringent and makes a good anti-inflammatory wash that can be applied to herpes, eczema, and scrofula. Taken internally, it stops diarrhea, stays the flux, and dries up the flow of milk in nursing mothers.

Dyeing

The leaves repel insects and can be used as an ad hoc insecticide. The hulls, husks, leaves, and bark are all used as vegetable dyes to yield various colors ranging from yellow to dark brown or black.

Paints

The oil is drying and can be used in oil paints as an alternative to Linseed oil. Recently, powdered shells have been incorporated into new types of ‘designer paints’ to produce interesting textures or in-floor paints, to produce an anti-skidding effect.

walnuts

Recipes

Pickled Walnuts

If you want to pickle walnuts, you have to pick them while they are still green and hanging in the tree. They have to be in an unripe state so that the inner shell is still soft and hasn’t turned woody yet. Typically, they should be picked in June.

Prepare a brine: 6oz salt to 1 quart of water.

With the help of a long needle poke the walnuts all over (don’t remove the green hulls) and cover with the brine. Steep for about 1 week.

Drain, and repeat: cover with fresh brine for another week.

Drain again. Spread the walnuts on a tray and let the sun dry them. Turn them from time to time.

When the walnuts are dry and have turned black, fill them into pickling jars. (Kilner jars, mason jars))

Prepare a spiced vinegar with:

  • 1oz mixed peppercorns
  • 1oz allspice
  • ¾ inch ginger root (fresh)

Add some dried chilies or coriander seeds, if you like. Lightly crush the spices and place them into a muslin bag. Simmer the bag in the malt vinegar for 10 minutes. Then let the vinegar cool down before removing the spices. Pour the vinegar over the walnuts and make sure the liquid covers them. Close the jar tightly. Macerate for 6 – 8 weeks before tasting them.

Stuffing

Walnuts make an excellent stuffing for mushroom, marrows, or puff pastry parcels.

Ingredients:

  • 12 medium-size mushrooms caps
  • 1 tbs. olive oil
  • 1 tbs. butter
  • ½ cup finely chopped onion
  • 2 tbs. coarsely chopped walnuts
  • 1 garlic clove, peeled and minced
  • 5 ounces frozen spinach, thoroughly defrosted and squeezed to remove most of the liquid
  • 1 oz feta cheese, crumbled
  • 1 oz Gruyere cheese, crumbled
  • 2 tbs minced fresh dill
  • salt and freshly ground black pepper and nutmeg to taste

Method:

Preheat oven to 400° F. Clean the mushrooms and remove the stems.  In a small skillet, heat the olive oil and butter. Add the onion and cook over medium heat, cover and sauté until soft.

Add walnuts and cook for another minute. Add the spinach and stir continuously for about 5 minutes. Take off the heat and cool slightly. Stir in cheeses, dill, nutmeg, and salt and pepper, to taste.

In an oven-proof pan arrange the mushrooms, cavity side up. Plop a wallop of the spinach/walnut mixture into each mushroom cap and bake for 8 to 10 minutes or until the filling turns brown and the mushrooms are thoroughly heated.

Walnut Liqueur

In Italy and France, walnut liqueur is considered a regional specialty. ‘Nocino’ in Italian –  although there are many versions of the ‘original’ recipe. The idea is simple: macerate green, unripe walnuts in a blend of clear alcohol, (e.g. grain alcohol), and syrup.

Method

In June, when the Walnuts are still green and soft inside (traditionally on St. John’s Day=Midsummer), pick your nuts straight from the tree. Wash and quarter the nuts.

Remember to wear gloves!

Fill a large jar with the nuts and add some spices, such as a couple of cinnamon sticks and a few cloves and perhaps a vanilla bean. Chop up an organic, untreated lemon (or orange, if you prefer) and add to the mixture. Pour in about 1 ½ pound of sugar and cover with 3 liters of grain alcohol. Close the lid tightly and steep for about 6 weeks. Keep in a warm dark place.

Test the liquid and adjust to suit your taste. Strain through filter paper and bottle. Store in a cool place.

Green Walnuts preserved in Syrup – from Mrs. Grieves – A Modern Herbal

‘Take as many green Walnuts as you please, about the middle of July, try them all with a pin, if it goes easily through them they are fit for your purpose;

lay them in Water for nine days, washing and shifting them Morning and Night;

then boil them in water until they be a little Soft, lay them to drain;

then pierce them through with a Wooden Sciver, and in the hole put a Clove, and in some a bit of Cinnamon, and in some the rind of a Citron Candi’d:

then take the weight of your Nuts in Sugar, or a little more; make it into a syrup, in which boil your Nuts (skimming them) till they be tender;

then put them up in Gally potts, and cover them close.

When you lay them to drain, wipe them with a Course cloth to take off a thin green Skin. They are Cordial and Stomachal.’

– (From The Family Physician, ‘by Geo. Hartman, Phylo Chymist, who liv’d and Travell’d with the Honourable Sir Kenelm Digby, in several parts of Europe the space of Seven Years till he died.’)

Walnuts are incredibly versatile – even if they are not the star ingredient, they never fail to give a dish a refining note. I sprinkle them on salads or use them instead of pine nuts in a pesto blend. They are also fabulous in desserts and cakes.

Caution:

People who are allergic to nuts should stay away from walnuts and all products derived from them or containing them. Likewise, people who are scared of calories should treat this nut with respect. However, replacing some of your normal dietary fat with walnut oil can be a very wise choice as walnut oil has an excellent nutritional profile and can help to fight free radicals while lowering cholesterol levels. Walnuts are a good source of omega-3 and omega-6 fatty acids.

Always wear gloves when handling walnuts – especially as long as they are still green. And leave some for the wildlife – it is an important source of food to carry them through the winter.

wildlife

How To Make Rose-Hip Syrup

How To Make Rose-Hip Syrup

Making Rose hip Syrup

Rose hips are a funny fruit: Gourd shaped little piglets, wafting in the wind! The bright red berries sprinkle the landscape with a glorious, shiny dash of color. In their early stages, rose hips are rock hard and difficult to pick. The coat is thin, the fruit flesh meager, and their bellies are filled with an abundance of hard little seeds that are embedded in fine ‘hair. Perhaps, this hair is just as irritating to a bird’s throat as it is to a human one. Not so long ago, schoolchildren tormented each other by using it as ‘itching powder’. The best variety to use for this purpose is the Beach Rose, Rosa rugosa, with its big, fat squash-shaped hips. It yields an abundance of fluffy stuff.

I can never resist the temptation of biting into the first rose hips that turn red in September, even though I know they are still hard and very sour. Inevitably, I end up spitting out the seeds and trying to get rid of the little hairs.

Rosehips are best picked after the first frost when their outer cortex turns soft and sticky. At this point, they can be gathered without a struggle and are much easier to process, too. But depending on your climate, that may come late, by which time there are not so many hips left, or they lost their appealing looks. If you have plenty of space in the freezer, you can also pick them when they are fully ripe and then place them into the freezer where they can soften and you can use them when you are ready for a day of action.

My favorite way to preserve them is to turn them into syrup or conserves, which make formidable Vitamin C bombs – much needed to boost the immune system during the winter.

When picking wild herbs, or fruit, I always ask the tree, bush, or plant for permission and explain why I need their help. I tell them that I need them to heal and nourish my friends and family and that I would very much appreciate their cooperation. I find that a plant addressed in that way will be much more cooperative and that I will be much more mindful as I pluck their leaves, fruit, or flowers.

It’s not exactly ‘news’ that Rose bushes have sharp little thorns. Those foolish enough to approach roses ‘mindlessly’ are sure to carry forth the battle scars. The rose will win, even if you manage to get a few hips. So, a mindful attitude helps, a lot!

If it tries to tuck at my clothes or rip my collecting bag I gently remind it that I am not doing any harm. Usually, we come to an arrangement. For example, I let it hold my bag since it tries to get it anyway. That leaves my hands free to pull off the hips. Wearing gloves helps.

When I first started making rosehip syrup I went through the painstaking process of cutting off each hip’s tail and snout, halving them, and scooping out the seeds and hair before putting them into the pot. This can be a very drawn-out and fiddly process! In fact, it was a pain in the neck (literally!) But then I found a better way! All you nee are frost-softened hips.

add mushed rose hips to boiling water

Simply wash and clean the hips (top and tail them) and put them into a grinder or processor with a little bit of water and grind them to a pulp. Then transfer the mush straight into a pot of boiling water (leave enough space for the mashed rose hips). This saves hours of labor and, what’s more, it also saves the most vital constituent of the rosehip, the vitamin C. There is an enzyme in the hips that is triggered by exposure to oxygen. One triggered, it activates an oxidation process that destroys vitamin C. Interestingly, the vitamin C loss from boiling the hips is lower than the potential loss from oxidation and, the boiling water kills the enzyme.

As long as the rose hips are not too hard they will mush up very easily. In no time, you will have the sticky goo of seeds and fruit pulp floating in the pot. Simmer gently for about 20 minutes. Then turn off the heat and allow to cool.

straining out rose hip solids
filtering rose hip liquid through cheese cloth

Once lukewarm, strain out all the solids and measure the liquid. To filter out all impurities, use a cheesecloth to filter the liquid after you have strained out the solid parts. Return the liquid to a (clean) pan and add a kilogram of sugar per liter of liquid. (Make sure you are using a large enough pan!) Stirring occasionally, let the sugar dissolve by itself for a while, before you return it to the heat. (This shortens the final simmering time considerably.)

Once the sugar has more or less dissolved, return the pan to the heat and simmer gently until all the sugar has dissolved completely. Meanwhile, sterilize your bottles. As soon as all the sugar is completely dissolved, fill the syrup into your prepared bottles, adding the juice of 1 lemon per liter of syrup. Top with a twist-off pop-up cap. Unopened, they will last as well, and as long as jams do, but once opened, they should be stored in the fridge.

bottled rosehip syrup
Foraging: Sweet Chestnuts (Castanea sativa)

Foraging: Sweet Chestnuts (Castanea sativa)

Nothing quite conjures up the magical atmosphere of autumn as the warm, sweet scent of roasted chestnuts. It immediately invokes images of bonfires and harvest feasts. When the days are getting shorter and there is that crisp little nip in the air, when the leaves turn bright in color and spread a thick carpet on the ground, when the earth smells musky and moist from the rain, the chestnut season is upon us.

Description

Sweet Chestnuts, which must not be confused with Horse Chestnuts, belong to the family of the Fagaceae, the Beech-Family, which comprises several genera and numerous species of trees with edible nuts, such as acorns and beechnuts.

They are at home in the temperate zone and shun excessively cold and wet regions. In Europe, their range extends as far north as southern England, but they are most comfortable in a Mediterranean climate, where they form quite extensive natural stands.

The North American native species (Castanea dentata) has largely been replaced by the Chinese species, which was imported in the early 1900s. Unfortunately, the imported trees were infected with a virulent blight that spread rampantly and wiped out almost the entire population of native Chestnut trees.

Sweet Chestnuts grow into beautiful tall trees, with elegant large, but slender leaves, with serrated margins. The leaves develop before the flowers appear in June. They form long golden-yellow catkins reminiscent of arboreal fireworks. The nuts develop in early autumn. They are protected by a very prickly outer shell (cortex). When the cortex splits it reveals two or three nutlets that are shaped like pixie-hats, with a pointed tip and tiny tuft of white hair. In natural stands, only one of the nuts develops fully.

Sweet Chestnut Flowers

Commercial Chestnuts are derived from a cultivated variety, in which the underdeveloped nutlets are missing altogether. The bulk of the commercial crop is grown in Italy, Spain, Portugal, and France, where chestnuts still play an important part in the traditional cuisine.

Foraging

If you are lucky enough to have a Chestnut tree in your neighborhood, the temptation to collect the very first nuts that fall to the ground in September is almost irresistible. But the early nuts are not yet fully ripe and are usually not worth the bother. It is better to wait for another couple of weeks. By October, the nuts are plump. The outer, bristly coats should be cracked open. Now it’s time to get busy, otherwise, the forest folk, the squirrels, and wild boar will beat you to it. The shells are really prickly, so thick rubber gloves come in handy. The easiest way to remove the cortex is by gently stepping on the nuts and rolling them around on the ground underfoot until the outer shell comes off by itself. Check the nuts for little holes. That would indicate that the worms are already feasting. Worms tend to be more of a problem after heavy rains or when the nuts have been lying on the ground for too long.

The most tedious part of the Chestnut harvest is not the collection, but the shelling. A fibrous membrane adheres to each nutlet beneath the shell. It clings to every crevice and cleft.

peeled chestnuts

There are several methods to remove this membrane, and the method of choice depends on how you intend to use the nuts.

But, regardless, the first step is to remove the outer husk. Cut a little cross on the bottom surface (of each nut. Without this precaution, they explode violently when being roasted. But even if you boil them, cutting the outer shell makes the process of shelling them and removing the membrane much easier.

To preserve Chestnuts for long-term storage you still need to shell them and to remove the inner membrane. Afterward, you can dry them quickly in the oven or dehydrator, to avoid mold. Once dehydrated, they need to be soaked in water prior to use. In France, a traditional method of curing the nuts was to spread them on the floor of a harvest hut and to smoke them for a period of time. Smoked nuts could be stored for up to a year.

Pan/Oven Method

Cut a cross on the flat side of each nut and place them in a heavy skillet. Add about half a teaspoon of butter per cup of chestnuts and roast at medium heat until the butter is melted. Put the pan in the oven at 475°F. After 10 – 15 minutes, remove the pan from the oven and take off the shells with a small sharp paring knife. It is a tedious process, but if done correctly, the inner skins will adhere to the outer shells, thus making the shelling process much easier.

Chestnuts are a wonderful, very nutritious wild food. Unlike most nuts, they are rich in both carbohydrates and proteins but contain very little fat and no cholesterol. This distinct composition has earned them their nicknames ‘l’arbre a pain’ in French, meaning ‘bread tree’ or the English equivalent, ‘the grain that grows on trees’. Their flavor and consistency are unique in that it lends itself very well to both sweet and savory dishes. A favorite is chestnut stuffing, but they can also be used in soups, nut loaves, cookies or desserts, or they can be ground into nut flour.

Recipes


Roasted Chestnuts

A simple and delicious way to enjoy Chestnuts is to simply roast them, either in the oven or on an open fire. In southern Europe, special chestnut roasting pans are used for this purpose, though they are not strictly necessary. They are basically frying pans that have holes on the bottom. But it is just as simple to roast the chestnuts in a regular pan. The important thing to remember is to make an incision on the bottom of each nut so that they don’t explode. Place in a pan and roast over a medium flame for about 15 min. The flavor is completely transformed by the process. Even if you intend to use them for other dishes, such as soups or stuffing, roasting them prior to any further processing is highly recommended. They also taste great straight from the pan or can be served with blue cheese and wine.

sweet chestnut roasting

Stuffing

Minced chestnuts are excellent as stuffing for birds, such as pheasants or goose. Roast onions and garlic, add boiled and minced chestnuts and rice along with chopped celery sticks and apples. Stir an egg into the mixture and season to taste, e.g. salt, thyme, sage, rosemary, mugwort. Add wholemeal flour, oats or wholemeal breadcrumbs until the mixture has the right consistency, neither too dry, nor too wet. Judge the amounts by the size of the bird.

Chestnut Loaf

The above-described stuffing can also be adjusted to make a nice chestnut loaf. The chestnuts can be mixed with other nuts, e.g. peanuts or walnuts. Mix roughly half and half nuts and rice, add grated or finely chopped vegetables, e.g. zucchinis, mushrooms, onions, and garlic either sautéed or raw, add an egg and flour until everything sticks together nicely. Season to taste. Fresh herbs such as thyme, rosemary, and a touch of sage are nice. Grease a bread pan and fill with the mixtures. Bake in the oven at about 375 degrees until a crust forms on the top and the dough no longer sticks when pricked with a wooden stick. Serve with steamed vegetables and mushroom sauce.

Glazed Chestnuts And Winter Vegetables

  • 2 large kumera (sweet potato)
  • 4 large parsnips
  • 4 small red onions, quartered
  • 12 whole garlic cloves, skin on
  • 1 tablespoon fresh rosemary leaves
  • 1 ½ cups peeled/blanched chestnuts
  • ½ cup maple syrup
  • ½ cup olive oil
  • salt, freshly ground black pepper

Cut kumara into large chunks. Cut parsnip in half lengthwise. Combine all ingredients in a baking dish; bake, uncovered in a hot oven (220°C) about 45 minutes or until the vegetables are tender and browned lightly. Turn gently halfway through cooking. Serves 6 to 8.

Curried Chestnut Soup

  • 1 large onion, finely chopped
  • 2 carrots, thinly sliced
  • 1 zucchini, chopped
  • 1 apple, grated
  • 1 cup mushrooms, sliced
  • 1 cup roasted chestnuts, minced
  • vegetable seasoning
  • ½ pint milk
  • ½ vegetable stock
  • 2 cloves garlic
  • Curry powder
  • Pinch cinnamon
  • Chilies to taste

Sauté the onions and carrots until the onions are soft. Add zucchini and apple. Continue to sauté and stir. Add mushrooms. Sprinkle 1 tablespoon of vegetable seasoning and a teaspoon of curry powder and a pinch of cinnamon into the vegetables and continue to stir. Add one pint of water. Bring to the boil and add the roasted and minced chestnuts. Stir continuously so as to avoid any of the ingredients sticking to the bottom. Press the garlic into the soup. Add 1/2 pint of vegetable stock and 1/2 pint of milk and simmer until all the vegetables are cooked. Season to taste with extra salt, coriander, cumin, and chilies. Adjust liquid level so the soup is creamy but not too thick. A tiny touch of honey can blend the flavors perfectly.

Baked Apples With Chestnut Stuffing

Roast the chestnuts as described above, shell and mince. Mix with raisins, sultanas, oats, and honey. Core the apples and fill the hole with the stuffing. Place on a cookie sheet and bake in the oven until the apples are soft. Serve with vanilla ice cream.

Chocolate Chestnut Mousse

Chestnuts combined with cocoa and amaretto make a perfect ending for a festive dinner.

  • 2 pounds of Chestnuts, peeled and cooked
  • 12 Tbs. of sugar or honey or to taste
  • 4 Tbs. of cocoa
  • 4 Tbs. of amaretto
  • 16 ounces whipping cream

Shell and peel chestnuts as described above. Boil until tender. Drain and add sugar or honey, cocoa, and Amaretto. Blend in a food processor until smooth. Beat whipping cream until stiff. Fold into the chestnut puree. Divide among dessert glasses. Chill. Decorate with whipped cream and chocolate shavings. Serves 10.

The mousse can also be used as a cake filling. Beware: it is very rich!

Sweet Chestnut-Cocoa Mousse

Preserving the Harvest (2)

Preserving the Harvest (2)

In the last issue, I talked about different ways to preserve food, from storing, canning, and drying to making jams and pickles. All of these methods serve to preserve food for later use to sustain the body. However, there is only so much jam and cake you can make with excess fruit.  But, hey, there is still something else you can do!

Traditionally, any excess fruit is distilled to yield fruit brandy. The Black Forest, for example, is famous for its Kirschwasser, but there are dozens of similar fruit brandies made from plums, raspberries, bilberries, pears, apples, apricots – you name it. But as home distillation is illegal in many parts of the world, we won’t go into it here.

Wine-making

Winemaking, on the other hand, is not illegal. Wine experts may scoff at such peasant brews, fruit wines can be excellent, highly idiosyncratic, fun to make, and inexpensive. One just has to abandon any preconceived ideas of what wine should taste like. If you enjoy experimentation, winemaking opens up a whole new universe of hitherto unimagined possibilities.

The process of winemaking is simple enough. It involves the straight forward process of converting sugar to alcohol and CO2, using the ‘bio-services’ of yeast, which does all the work. (Sorry, wine-making is not CO2 neutral.)

There are gazillion different recipes for just about any fruit or vegetable imaginable. But grapes are considered ‘ideal’ in terms of the balance of acids and sugars. They require little or no adjustments. The most difficult aspect is the measuring process used to calculate the acid/sugar/ and potential alcohol content of the resulting brew. That is if you are going to get technical about it and expect to have some control over the result. Good wine does not happen by accident (although it may). When making wines with other fruits the wine-maker periodically takes a sample to measure the acid and sugar levels and makes adjustments accordingly.

Beginners often find it confusing that there is no general method that applies to all fruit. Each is considered for its own specific merits and treated accordingly. Although when just starting out one tends to want to follow a tried and tested recipe blindly, it ultimately will be to your advantage to learn about the chemistry involved so that you can make your own decisions based on your specific measurements.

Hot summers produce sweeter fruits than cold and rainy ones. Personal taste also comes into play. Some prefer a lighter, fruitier wine while others like a heavy, full-bodied one. As in all food ventures, the better the quality of the source materials you use, the better will be the result.

Basic Method:

  • Select and prepare the fruit: take off stalks, remove large stones
  • Transfer to a bucket and bruise/mash
  • Add water (the flavor would be too strong if left undiluted)
  • Add other flavoring agents, such as ginger or raisins

Many winemakers add Campden tablets at this stage for the purpose of sterilizing the brew. Others just add the yeast and allow nature to run its course. Whichever method you follow, the important thing is not to add yeast and Campden tablets at the same time as this would destroy the yeast.

After adding the yeast, leave the mixture to ferment, but cover the container. This primary fermentation usually takes approximately 3 – 7 days.

Siphon the liquid off by transferring it to a demijohn. Bung with an air-lock to prevent oxygen from entering. Fill the demijohn to the top. Check the sugar/acid content and make adjustments as needed. Let it ferment for a further 4-6 weeks.

Avoid opening the demijohn unnecessarily so as to minimize exposure to air, especially in the beginning when the alcohol content is low. But if the fermentation process slows down too soon, test and if necessary, feed it with additional sugar.

When the right alcohol/acid/sugar balance has been achieved, the liquid is siphoned off, filtered and filled into bottles. After 6 months to 1 year, the wine will be good to drink.

Winemaking is not complicated. But if you want really good results you have to invest in a range of tools and equipment and learn how to use them. You also need enough room to store the materials and the demijohns. But the satisfaction and sense of discovery derived from it are absolutely worth the effort. Just don’t expect your wine made from Bananas to taste like a Chardonnay. And, be patient!

It would go far beyond the scope of this article to describe all the tools that are necessary to get started or the additives that may improve the quality of your wine. Join a wine-making forum to discuss your projects and learn from others who are also practicing this fine art. Below are some links to pertinent pages and forums:

Liqueurs

This kind of sweet, alcoholic ‘dessert’ is easy to make and quite delicious. Macerate the fruit or herbs in a strong alcohol base such as Vodka, for several weeks. Remove the fruit and add sugar or spiced sugar syrup. Fill into glass jars and allow to stand for several months more – the longer you leave them the better they get.

Rumtopf

This is a great way to preserve excess amounts of fruit. And what sweet memories it of the summer past it will bring with when you dig into it in the winter.

Rumtopf consists of fruit, sugar, and rum. It is basically a collection of seasonal fruit preserved in and macerated in sugar and alcohol. Traditionally, it is started with the first soft fruit of the year – usually strawberries. Remove the green bits but keep the fruits as ‘whole’ as possible. Place a layer of fruit into the rumtopf (a tall earthenware pot), then cover it with a layer of sugar (equal amount in weight). Finally, add rum to cover the fruit with about 1inch of alcohol. Place the lid on top and leave in a cool, dark place. Every month a new fruit is added following the same procedure. Strawberries, cherries, currants, gooseberries, raspberries, peaches, plums, apples, pears – whatever you fancy. Most people prefer to make a batch for red fruit and a separate batch for yellow fruit or use red fruits only. By Winter Solstice you will have a lovely jug full of highly potent fruit that makes a very warming condiment for ice cream or other desserts.

Elderberry wine

  • 3 lbs fresh elderberries
  • 3 lbs sugar
  • 8 pints of water
  • 1 teaspoon citric acid
  • Wine yeast

Clean and strip the Elderberries from the bracteoles (can be done with a fork) and remove all green parts. Place in a bucket and bruise the berries to release the juice. Boil the water and pour half of it over the berries. Set aside until cool. Dissolve the sugar in the rest of the boiling water and strain the berries through a sieve on to the sugar. Add the lemon juice and the yeast (the liquid should be warm, but not hot). Pour the liquid into a demijohn and seal with an airlock.

Keep the wine in a warm place and allow the fermentation to run its course. When the bubbling has ceased, siphon the wine into a clean jar, a process that winemakers call ‘racking’. This is done to remove any sedimentation (known as ‘lees’). Store the demijohn in a cool place and rack intermittently until no more sediments form. When the fermentation has ceased completely, there are no more sediments and the specific gravity is 1000 or less, the wine is ready for bottling.

Green Walnut Liqueur

  • 750 ml fruit brandy
  • 500g brown sugar
  • 1 Vanilla bean
  • 3 inches of crushed Cinnamon stick
  • 3-5 star anise, roughly crushed

Pick about 30 green walnuts (traditionally on St. John’s Day / 24 June) while they are still soft. Cut into slices and place them into a wide-mouthed jar. Pour 750ml of fruit brandy, or eau de vie over the nuts and macerate for 4-6 weeks. Strain and discard the nuts. Prepare a syrup with 500g of brown sugar and 500ml water. Scrape the inside of the Vanilla bean, and add to the syrup along with the crushed Cinnamon and the Star Anise. Simmer for 5 minutes. Stir in 1 teaspoon of Cocoa powder and the juice and zest of 1 organic orange. Set aside to cool, then mix with the walnut filtrate and fill into jars (Kilner jars). Allow macerating for at least 3 months. Filter and bottle.

Climate Change – what can we do?

Climate Change – what can we do?

“The climate emergency is THE defining issue of our times.”

It is the beginning of August, the time of ripening fruits. The year is progressing rapidly and the sun is already past its peak. It has been a stormy first half of the year with weather extremes throughout the world. Temperatures nearing 40°C which in my neck of the woods is unheard of, especially this early in the season. July and August can always bring swelteringly hot days, but this appears to be a new kind of normal. We urgently need to rethink the squandering of our planetary resources and what can be done to address this burning issue.


Climate Grief


As the intensifying seriousness of the situation is burning into my skin I find myself cycling through the stages of grief. Denial is no longer possible. Some days, I am overcome with grief and inconsolable sadness. I long for a state of reliable normalcy but know in my heart that nostalgia is futile.


Some days, I am almost numb with shock and disbelief. The seemingly wilful destruction of our beloved home planet is simply incomprehensible.


Some days, I just get angry as hell.


But, deep within me, there is still a beacon of reason reminding me that these feelings are the drivers of change, that the way forward starts exactly right here, where I stand. All I have to do is to take a step outside of the ‘normal’ complacency of my comfort zone. All I have to do is to challenge myself with questions about the changes I want to see in the world. What can I do to make a difference in my own life and in my immediate social surroundings?  Such questions empower me and transform sadness, frustration, and anger into determination – powerful energy for change.


We each are the ‘gardeners’ of our worlds and choose, at each step of the way, the seeds we want to grow and that there will be to harvest when the season comes. Instead of just concerning ourselves with fulfilling only the short-term demands or temptations, perhaps it would be a good idea to take the long-range view and ask ourselves that crucial question: how do we want to shape the world? What will be the fruits of our action or inaction? What will we harvest, when the time comes? And what kind of environment and seed store will we leave for our children and children’s children?


Our time here on this planet is short but our effect on the lives of future generations is huge.

In Norse mythology, Mid-summer inaugurates the time when the fiery God Lugh takes over from the bouncy Bel.


Bel warms the earth and quickens the seeds, Lugh ripens the corn and sweetens the fruits. But Lugh can also bring almighty thunderstorms and heavy monsoon-like rains. In recent years these phenomena are spinning out of control at alarming rates.

To be sure, even in the past, August could bring short but intense rains that refreshed the land. Maybe even an occasional hail storm, which farmers feared, but rarely did it bring complete devastation. Nowadays, hail comes in the shape of ping-pong balls, destroying crops in a matter of minutes. The amount of rain that normally falls over the course of a month now often deluges towns in just a few hours. Cities are flooded and little streams turn into raging rivers at very short notice. New weather records are broken every year. We can’t deny it – climate change is here.


We have seen it coming, yet few have been ready and willing to act. People are looking for guidance from authorities, but that is in short supply. Given that politicians are in office for only a short period of time, their priorities lie with short-term goals. Bureaucracy is slow to change and unpopular messages reduce the chances of being re-elected. Fear may help to sell even the most unpopular draconian policies, but it is not a useful tool for attracting votes.


People want simple answers to our woes. Unfortunately, there are no simple answers to climate change. It is a hugely complex and new phenomenon that we are only just beginning to understand fully.


It seems, without guidance from ‘above,’ we must find ways to help ourselves.


So, what can we do?


Perhaps it is time to reflect on what has helped us to get this far on our evolutionary journey.


Human beings are nothing if not curious and what has helped us the most is our keen sense of observation and experimentation. Observing the phenomena that are happening around us and paying close attention to what works and what does not. The task seems daunting. There are so many fires, so many issues that are screaming for attention. Whole ecosystems are affected by the changes that are taking place. How can we possibly address them all at once?

The world around us is a system. Whatever we do, the effects are never isolated but will affect the whole. The crucial aspect to realize is that WE ARE ALSO A PART OF THAT SYSTEM! Therefore, whatever we do in the world out there also has repercussions on US.

That realization can be even more depressing. But it shouldn’t be, because it also is the key! It is the key to understanding that we must start with ourselves and all that we do. We may not be able to fix the whole world by ourselves, but we can each fix our own world by taking responsibility for our lives and our actions. We can start by reflecting on how our own habits affect the world and make changes to minimize that impact

Some habits and practices are harder to change than others, but we each can start somewhere! 

There are things that we can do

  1. Organize
    The most important thing all of us need to do right now is to bring climate change into the conversation. If possible, group together with friends, family, and your community specifically to discuss how you have been affected and what, as a group, you may be able to do about it. A group can always achieve more than any one individual. Skills, know-how, and tools can be sourced and shared. Instead of feeling like a lone soldier fighting a losing battle you can tackle issues together, support each other and empower one another in doing so.
     
  2. Plant trees
    Encourage your community to plant more trees, and if you have the means and space, plant some yourself. According to a recent report, trees are the single most effective way to combat the rise of CO2. Even communities in poor countries, such as Ethiopia and India, have embarked on massive tree-planting campaigns. They are literally planting MILLIONS of trees. To optimize such an effort it makes sense to plant a variety of species and not just one fast-growing type. Diversity will build resilience as different trees react differently to various climate conditions.

Trees not only function as massive CO2 sinks, but they also create shade for other, more sensitive species, and help to conserve water by creating shade. Trees are also a vital component in the water cycle that regulates our climate. They are absolutely key to almost any ecosystem. They clean the air and produce oxygen, which we all need to breathe. Air pollution is currently one of the biggest environmental health hazards, according to a WHO report. It claims the lives of some 4.2 million people each year.

Extra kudos if you can plant trees with edible fruits and nuts that can provide food for people and wildlife.

wild flower meadow

  • Conserve water
    A lot of water is simply wasted – not just on sometimes obsessive hygiene routines but also because it just gets drained into the canalization. In places where the water system is not well developed, some of it may drain directly into streams or rivers, adding to the pollution.


Most people won’t have the opportunity to build a compost toilet in their back yards or find ways to easily separate grey water from solid waste. However, you may be able to save some greywater from the sink and ‘donate’ it right to your garden. But, make sure that you are using biodegradable detergents, otherwise, the toxic substances can build up in the soil.

An easier way to conserve water is to collect it from the drain pipe. Instead of letting it wash down the drain, divert it into a tank or water barrel to be used for watering the garden. Make sure the container is covered, otherwise you will provide a breeding ground for mosquitoes.

Gardens are notoriously thirsty. This is especially true of lawns and vegetables. A good way to help conserve water is to mulch your veggies. Irrigating plants with a slow trickle watering system may also work well. Take a container (some people use plastic bottles but un-fired earthenware is better) and puncture several times to make some small holes. Dig a hole in the veggie plot and submerge the container so that it is level with the ground, fill it up with water and cover with a stopper. That way water continuously seeps into the ground. If your garden is large and you can dig in several such containers this is a good way to reduce the time and effort it takes to water.

Another good way to save water is to abandon the idea of a perfectly manicured English lawn. Instead, aim at a perfect wildflower meadow or plant more fruit trees or veggies. Or consider replacing your water thirsty turf with a more water conservative variety,  which is now offered at garden stores (e.g. Bluestem Enviro-Turf). Fleur de lawn includes low growing herb species such as white clover that fixes nitrogen in the soil and provides nectar for bees.


  • Composting
    The earth is covered by a thin layer of fertile soil. Due to erosion, this layer is continuously reduced. Farmers have to add tons of fertilizer, most of it inorganic, in order to sustain their yields. Heavy machinery further destroys the soil structure and compacts the soil. The negative effects of this type of farming practice are cumulative and turn into a vicious cycle. The only way to break this downward spiral is to change the way we look at the soil.


We derisively call it dirt and regard it as a rather lowly element. Yet, even a couple of handfuls of soil contain more micro-organisms than there are humans on earth. The soil is alive and constantly working to make this planet habitable for ‘higher’ species. The micro-organisms do this by breaking down organic materials that plants can assimilate. They also aerate the soil so that rain can penetrate the deeper layers instead of just running off the hard, impenetrable surface. But micro-organisms need one thing to do their job:  organic material on which they can work their transformative magic.

This is where compost comes into the picture. Compost is what your organic waste turns into when it is broken down by worms and other creatures that live in the soil. Some may think that composting is gross. But what is truly gross is to dump organic and inorganic waste all together into a bin which eventually ends up as toxic sludge in a landfill. By composting your organic materials and using it in your garden you will actually improve the fertility and soil structure of your plot, which not only helps it to retain more moisture but will also make your veggies more nutritious.


There are many other measures we can take to make a difference. Some may need a bit of organizational effort: carpooling for school or shopping runs, or forming buyers co-ops so as to make high quality, organic foods more easily and more cheaply available in low-income neighborhoods. Others may require an investment that will actually save money over time. such as exchanging energy-hungry appliances for more efficient ones or installing solar panels or wind power generators.


The climate emergency is THE defining issue of our time. It does seem daunting – almost too big to even contemplate. But once we stop to think about our own behaviors and habits and what we individually can do to make a difference, we realize that many little steps can eventually bring about the change we so desperately want and need.


Collectively changing our consumer habits and voting with our conscience will eventually ring the bell at the government level. We must make it clear that we do not want to go down the road of certain planetary destruction. In democratic countries, governments depend on our approval and cooperation – and that is where our power lies.