Foraging Goutweed (Aegopodium podagraria)

Foraging Goutweed (Aegopodium podagraria)

Goutweed (Aegopodium podagraria L.)

Synonyms: Bishop’s Weed, Ground Elder, Jack Jumpabout

For foragers, this early part of the year, when Mother Earth is just awakening, is a delight. The first tender bits of greenery are poking their leaves through the earth crust, turning the ground green once more. This time of the year is particularly wonderful for foraging young and tender greens. One of the earliest wild edibles that you can always count on is goutweed. Although many gardeners hate it and consider it an absolute bane, I actually love it. There are few wild edibles that are so widely available, and so tasty!

A  gardener’s nightmare?

I am probably the only person ever to have said this! Ok, it is quite invasive. Trying to confine it to a particular spot in the garden is quite hopeless as it spreads via its roots. And when you try to weed it out you are sure to break them. But before you know it – hey presto! -it magically regenerates even from tiny bits of root that are left in the soil. It is truly resilient.

…Or a blessing? 

This resilience makes Goutweed one of the most abundant herbs.  In mild climates, it pops up as early as February and it is incredibly versatile. s. and can be used with just about anything. I have made soups and salads as well as fillings for things like empanadas, cannelloni and lasagna. Of course, you can just serve it as a green vegetable, or make a pesto with it. It is also one of the best candidates for the ‘greens jar’.

What is a ‘greens jar’

A greens jar is where all the surplus herbs end up when you have picked more than what’s needed for the next meal. I dry them, crumble them up and put them into the jar. I love this concept of an ever changing herb-mixture ready to use in soups and what not when those herbs are no longer in season.

What is Goutweed?

Goutweed is a member of the ‘Apiaceae’, also known as ‘Umbillifer’ or Parsley family. As such, it has many cousins that are commonly used in the kitchen, whether as a vegetable or as a herb or spice, such as Carrot, Fennel, Coriander, Parsley and Dill, to name but a few. However, do not let that deceive you into thinking that all herbs of this family are safe for human consumption.

A positive ID is key

Some members are extremely poisonous – such as, for example, the deadly water hemlock, the herb that killed Socrates. So if you intend to pick ANY of these umbellifers for food, make sure you are absolutely certain that you have ID’d them correctly – a mistake could be fatal and they are not the easiest family to ID.

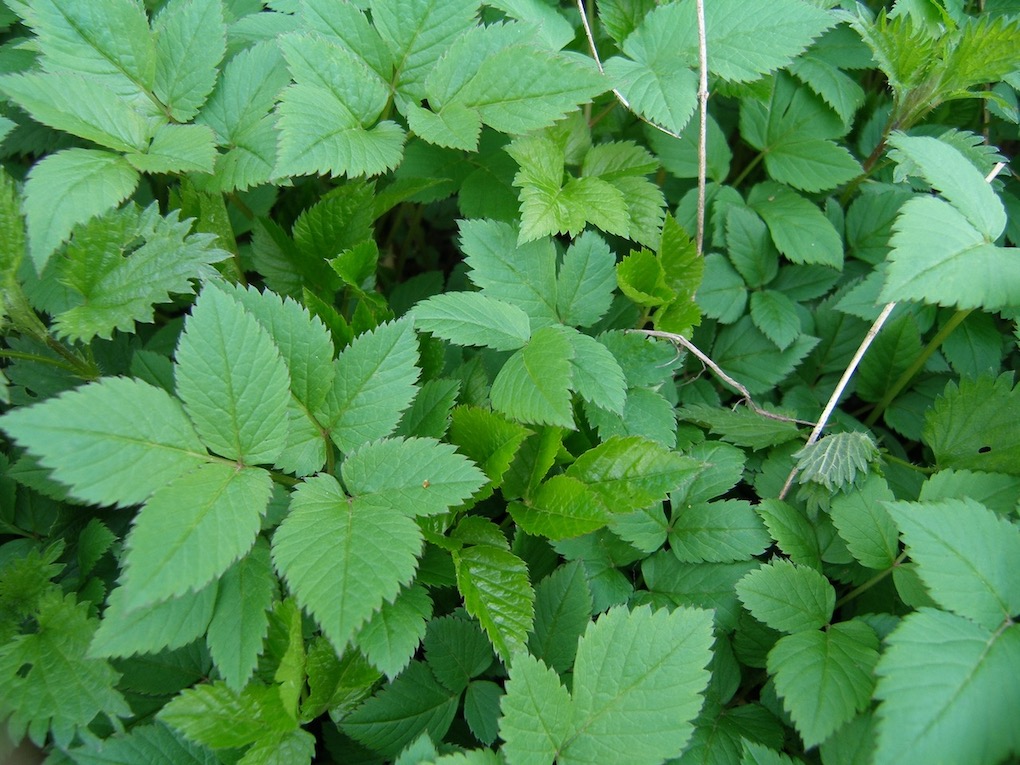
However, you will be pleased to know that Goutweed does not look much like Water Hemlock, so the chances of mistaking it are quite remote. US-based foragers are more at risk of mistaking it for poison ivy. The leaves of both of these plants sprout in threes and are of a similar size and shape. One distinguishing feature is that Goutweed will NEVER grow like a vine. But poison ivy does not always grow as a vine either.

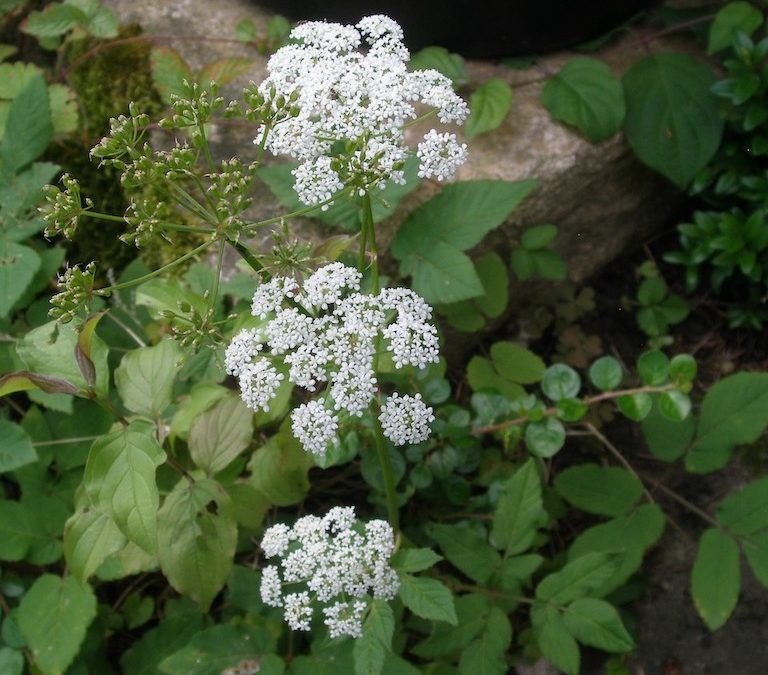
Distinguishing features

Once the flowers are out they are easier to distinguish. Goutweed has a typical umbel shaped flower while poison ivy has trailing flower clusters. Goutweed never develops any woody parts and older leaves are not glossy. Prior to unfurling, the very young leaves are shiny and bright green. Goutweed does not look hairy. It usually occurs ‘en masse’ and individual plants grow to about 50-60 cm tall.

Distribution

Goutweed is common throughout the temperate zone of western Eurasia and has been introduced to Britain and Ireland, to the US and Canada as well as to Australia, Tasmania, New Zealand and Japan.

History

While it is most common as a ubiquitous garden weed, it can also sometimes be found in the wild. These wild plants are garden escapes. Originally, the Romans spread it throughout northern Europe. In medieval times, it was commonly grown in monastery gardens. For a while, it was even sold at the market. But due to its invasive nature, it eventually lost favour with gardeners and was banned from their plots. And so, it escaped into the wild where it now mingles with nettles and graces damp ditches and partly shaded lanes.

Nutritional benefits and uses

As the name suggests, Goutweed has been used to alleviate the pain of gout. But this use has largely gone out of fashion with modern herbalists. Nevertheless, it is a useful cleansing herb, stimulating the processes of elimination. It is a diuretic, but it also gently stimulates digestive functions and metabolism. Nutritionally, it is a good source of vitamin C and A, and minerals such as iron, manganese, and copper as well as trace minerals such as boron and titanium.

Cooking with Goutweed

Goutweed is very aromatic and has a flavor that is similar to Parsley and Celery. It is very versatile and can be used like spinach. The young, still folded leaves are best. Older ones are tougher and develop a more pungent flavour. The nice thing is, even once it is harvested it will soon grow back 🙂

Recipes


Goutweed Soup

  • 1 large onion, chopped
  • 2 cloves of garlic
  • 2 medium-sized potatoes, peeled and cubed
  • Handful of mushrooms
  • 2 large handfuls of young goutweed, washed well and chopped
  • Vegetable stock

Sautee the onions till soft. Add mushrooms and garlic. Add the potatoes and sautee for 3 minutes or so. Add Vegetable stock (about 1 litre) and cook the soup until the potatoes are soft. Add the goutweed and simmer for about 5 minutes. Puree, dilute to desired consistency and add salt, pepper, chilies or other herbs to taste.

Empanada filling

  • Onion, cut fine
  • Mushrooms, cut small
  • Tofu, crumbled
  • Garlic, minced
  • Goutweed, chopped

Make your empanada pastry (many people just use a basic shortcrust recipe, but feel free to make the dough as fancy as you like.) Chill in the fridge for at least an hour. Roll it out in 6″ diameter rounds.

For the filling, crumble the tofu and fry in a little bit of soy sauce until crispy. Set aside.

Sauteé onions, mushrooms, and garlic add seasoning

Add the tofu bits.

And finally, stir in the chopped goutweed and sauté until wilted. You should now have a pan full of delicious filling for your empanadas. Cool the filling for an hour or so.

If the mixture is wet, add some bread crumbs to absorb the moisture.

Preheat the oven to 350°F = 176°C

Line a cookie sheet with baking paper

Place a spoonful of filling in the centre of your empanada round and fold it over to make a parcel. Press together the edges, with a little water if necessary to make them stick. Glaze with egg-wash (egg yolk mixed with a little water). and arrange the empanadas on it. Bake for about 30 min.

No doubt you’ll come up with dozens more delicious recipes – that is the wonderful thing about things like Goutweed, which just provide you with a tasty, healthy green to add to just about anything.

Foraging Wintercress – Barbarea vulgaris

Foraging Wintercress – Barbarea vulgaris

Winter is a tough time for foragers stuck in a northern climate zone. Leaves have fallen and are buried underneath the snow (or, in the mud, at any rate). Berries, if there are any left on the bushes, tend to look wrinkled, blemished, and listless. Nuts have long been gathered and stored for later use.  Those that have been left on the ground are now riddled with worms. So, what is a poor northern hemisphere forager to do?

Well, she might make a beeline for the pantry, where hopefully, she will find jars filled with delicious preserves. Jams, pickles, and chutneys will bring back happy memories of happy foraging days spent roaming through the countryside. Picking the gifts of the Earth for drearier times to come – like these drab old winter days.

Each mouthful of these treasures will lead you down a dreamy trail, not just reminiscing about the summer past, but also of the one to come. Winter Solstice has passed. Although it does not seem like it, spring is nearer than we thought. Three months down the road we’ll be off again, picking the first salad herbs and enjoying the first gifts of spring.

Those who do not live in the permafrost zone may be lucky enough to find a few green things hardy enough to withstand the winter. Cresses, for example, have no problem surviving a mild winter.

Take Wintercress, Barbarea vulgaris – a typical cress, easily recognizable by its typical rocket-type leaves and flowers. This tough little plant can be collected throughout the winter. It can even stay green beneath the snow.

Wintercress is rich in vitamin C and A and was valued as an ‘anti-scurvy’ plant until vitamin C became readily available throughout the year, even in northern climate zones. If you have trouble spotting its large-leaved, deeply lobed rosette during the winter months, you will probably notice it as one of the first herbs that pop up in the earliest spring days.

The leaves are best while they are young and tender, before the plant starts to flower. Young leaves can be added to salads much like rocket (arugula), which has a similarly tangy flavor. As they age the leaves turn tougher, rougher, and rather bitter. If need be, they can be used as a potherb, although it would not be the most palatable one. Boiling the herb in several changes of water may reduce the bitterness, but it would also destroy its texture and diminish its nutrient value. Better just to use it sparingly and in combination with other, less flavourful herbs.

The cress family includes quite a number of herbs that are of interest to the forager. They all start to sprout early in the season. Here is a good page to help with watercress identification: Barbarea vulgaris ID 

Recipes


Sandwich spread

  • 1 egg (hard-boiled)
  • ½ onion finely minced
  • 30g mayonnaise
  • 100g wintercress finely chopped
  • salt, pepper to taste

Blend the egg and the mayonnaise to make a paste, add the onion, wintercress, salt, and pepper. If you don’t like mayonnaise try crème fraiche, instead.

Wintercress ‘Spinach’

  • 250g wintercress
  • Knob of butter
  • 1 onion
  • 20g sugar or honey
  • Salt, pepper, coriander, bay laurel, cloves

Wash and chop the wintercress. Sauté with the minced onion and spices with just a little butter. Add a small amount of bullion if need be.

Wintercress Salad

  • 150g Wintercress
  • 1 mozzarella cheese (200g)
  • 1 tomato
  • 1 small onion
  • 1 clove garlic
  • Vinaigrette
  • Olive oil, balsamic vinegar, salt, pepper

Chop up the wintercress, slice tomatoes, mince the onion and garlic and cut the mozzarella into cubes. Mix well and serve with a simple vinaigrette.

Jerusalem Artichokes

Jerusalem Artichokes

Foraging Jerusalem Artichokes (Helianthus tuberosus)

When autumn blows in and the leaves have all but disintegrated, when nothing but a few buds remain, as dormant hopefuls firmly closed at the tips of the branches, when only evergreens still hang on to their green foliage, I sometimes get the forager’s blues. Nothing much is going to stir until the end of January!

But wait – there is one thing, all too easily forgotten, that makes a perfect foraging crop for this time of the year: Jerusalem Artichokes.

Ecology – abundance for all

Although often grown as garden crops, they are also popular as ornamentals. They are the perfect ‘edimental’. They do sometimes escape the confines of the garden wall – although it would not be accurate to say that they have become naturalized (in Europe) or, for that matter, invasive, as some conservationists fear. But due to their vitality and habit of spreading via their tubers, they do have that potential. Gardeners sometimes lament the fact that once planted they are hard to contain. At any rate, for the wildlife, they are an asset, providing pollen and nectar for bees and other insects, seeds for the birds, and the roots have long been used as fodder. (Attention: they may attract wild boar!)

Sun Choke Flower
Jerusalem Artichoke
Sunflower
Sunflower

Cousin of Sunflowers

Neither from Jerusalem nor an artichoke, these cheery plants are actually a type of sunflower, although their big cousin has a much grander stature: with their huge floral disk and enigmatic, spiral seed patterns they are quite a sight to be seen. A welcome food dispenser when their seeds ripen, Sunflowers are also bird magnets.

The Jerusalem Artichoke, on the other hand, has all the charm of a sunny garden flower whose bright yellow blooms provide blooming cheer in late summer. Alas, they are quickly forgotten, once autumn moves in and their flowers have withered and died.

Harvesting

Late autumn is the time when the crafty forager (who plans ahead) should carefully mark the spot, before s/he turns her attention to other autumn favorites.

As soon as Grandfather Frost has crept across the land and chilled whatever may have been left of the summer’s greenery, it is time to turn your attention to the underworld, where the life-force is hibernating, deep within the womb of Mother Earth.

Return to those well-marked spots with your digging sticks and poke around for the tubers of the Jay Choke (also known as Sun Chokes). Be careful, so as not to uproot the whole plant. There is no need to stockpile – the tubers stay much fresher right there in the earth itself, where they can be dug up any time you want them. (At least as long as the ground is soft enough to dig!)

The frost will turn the starch content of the tubers into sugars, which gives them a lovely, sweet nutty flavour. If you do decide to harvest the whole patch, throw some pieces back into the ground to ensure a continuous supply for the following year.

Jerusalem Artichoke tubers

The tubers

The tubers vary considerably in shape and size depending on your variety. Some are relatively straight while others look like a cross between a ginger rhizome and a potato, and are covered all over with little knobby protrusions. These types can be tedious to peel, but the good news is – they are completely edible, skins and all. Just scrub them well with a small brush to remove all the dirt. If you do peel them, toss them into lemon or vinegar water to prevent them from turning grey.

Although they can be collected all year round, Jerusalem Artichokes are an excellent winter crop, and they are best after the first frost. They originate in the US, but somehow, failed to excite consumers – or perhaps proved too tedious for growers, once agriculture became industrialized, since it was difficult to automate the harvest. The tubers also bruise easily, which is not a great selling point, as far as supermarkets are concerned.

Nutritional benefits

It is a shame that they are not more commonly known, since they make an excellent replacement for heavy starches. Instead of starch, they store their energy in an inert sugar known as inulin, which is suitable for diabetics and does not add calories to the extent that other starchy vegetables do. They are also rich in iron, which is good news for vegetarians, and others who may lack this important nutrient due to excessive blood loss.

Jerusalem Artichokes are often compared to potatoes. However, it would seem to me that people who make such a comparison, have either never eaten potatoes, or else, have never eaten Jerusalem Artichokes. Other than the fact that they are both tubers they don’t have much in common, IMHO. Jerusalem Artichokes bear much more similarities to water chestnuts. They can be eaten raw, dipped in dressing, or added to salads, which preserves the crispy, nutty flavour. Or, they can be baked, steamed, stir-fried, or cooked. However, be careful not to overcook them, as they will turn to mush. Of course, you could mash them, but the resulting goo is not very satisfying. Nor will they turn crispy, like potatoes, when stir-fried. If you want to preserve the crunchiness it is best to slice them and to throw them in at the last minute. Or, just eat them raw.

Notes

Jerusalem artichokes are not considered suitable for dining in polite society due to the fact that they are likely to produce a lot of gas. Lacto-fermentation is said to reduce this effect.

In Germany, the tubers are used to distill a Schnapps.

The tubers could also make a useful biofuel (ethanol) species – it is very undemanding, produces prolifically, and doesn’t need any fertilizer or pesticides.

CAUTION: People, who are allergic to Compositae plants (daisy family) may be sensitive or allergic to Jerusalem Artichokes.

Recipes


Baked Jerusalem Artichokes with Bread Crumbs, Thyme, and Lemon

  • ½ pint crème fraîche or double cream
  • 1 lemon, juiced
  • 2 cloves garlic, peeled and finely chopped
  • 1 good handful fresh thyme, picked and chopped
  • 1 to 2 handfuls grated Parmesan cheese
  • 3 handfuls Jerusalem artichokes, peeled and sliced as thick as a pencil
  • 2 good handfuls of stale bread crumbs
  • Salt and freshly ground black pepper
  • Olive oil

Preheat your oven to 230°C/450°F.Gas 8.

Marinade:

In a bowl mix together your creme fraiche, lemon juice, garlic, half the thyme, and most of the Parmesan cheese, and season to taste. Dilute with around 6 to 8 tablespoons of water and throw in the sliced Jerusalem artichokes.

Mix well and place everything in an ovenproof baking dish. Cover with tin foil and bake for 35 minutes.

Crust

Mix the bread crumbs, the remaining thyme, and some salt and pepper with a touch of olive oil. Remove the artichokes from the oven, discard the foil and sprinkle the remaining Parmesan over the top. Then sprinkle the seasoned bread crumbs over the Parmesan. Use up all the bread crumbs. Bake in the oven for about 15 minutes until the bread crumbs turn golden. If you’re in a pokey kind of mood you can poke the artichokes about a bit so some of the bread crumbs fall underneath them. This makes it look more rustic instead of like a crumble.

Prep Time: 15 minutes

Cooking Time: 45 minutes

Gingered Jerusalem Artichokes

courtesy of Leda Meredith

1 dozen medium-sized Jerusalem Artichoke tubers

Cut off ends and scrub clean (do not peel) Slice into matchsticks or rounds no more than 1/4-inch thick.

Marinade:

  • 2 Tablespoons soy sauce
  • 2 Tablespoons rice vinegar
  • 2 Tablespoons toasted sesame oil
  • 1 clove garlic, peeled and minced
  • 1-inch piece of fresh ginger root, peeled and grated

Blend ingredients well and toss the Jerusalem artichokes into the marinade, cover, and leave in the refrigerator for at least one hour (or overnight–the flavors will continue to develop). Serve on small plates as a salad appetizer before a stir-fry or other oriental style meal. This recipe is also delicious made with Burdock root.

Plant Profile: Walnut

Plant Profile: Walnut

Walnuts (Juglans regia)

It’s ‘nutty season’! (No, I don’t mean politics, in this case) I have was reminded of the fact by the intermittent popping noises coming from outside my window and by the mass of fuzzy hazelnut balls that are piling up on the front porch. These Turkish hazelnuts are plentiful, for sure, and easy to collect. But they are small and extremely tedious to crack. Thankfully, nature provides plentifully and these are not the only nut trees around. We also have some Walnut trees – English Walnuts, that is! Majestic to behold, Walnut trees, are among my favorite trees, and seeing them laden with nuts is a joy.

The ‘foreign tree’

Walnut trees (Juglans regia) are well integrated foreigners in our northern latitudes. Their home is in the warm, and fertile regions of south-east Europe, northern Greece, northern Italy, and France, where they are widely cultivated. Walnuts reached the ‘Low Countries’ north of the Alps in the pockets of Roman soldiers. But, it took several centuries before they really made themselves at home. Teutonic tribes, who gave them their name, apparently regarded them as an oddity, which is expressed in the name they gave the tree: ‘Walnut’ is derived from the Germanic word ‘welsh’, meaning foreign.

They did not reach Britain until the 16th-century and are only found in the warmer, southern parts. The Roman nut became known as the ‘English Walnut’, perhaps to distinguish it from the American walnut (Juglans nigra), or the Pecan nut (Carya illinoinensis). So, it seems this ‘foreigner’ has not only well adapted to its new home but has also been adopted by the locals, who think of it as one of their own.

A southerner in northern climes

Although in time walnuts adapted quite well to the much harsher northern climate, their southern origin becomes evident in spring. Despite the fact that they come into flower quite late (April), they remain vulnerable to late frosts, which can quickly ruin the prospects of a good harvest.

A generational tree

In previous centuries, walnut trees were considered so valuable that they were specifically itemized in the will. A productive grove could cover a good part of a family’s livelihood. But that aside, planting a walnut orchard was an investment in the future: walnut trees are slow to mature. Although they start to produce nuts from the tender age of 15 years, they don’t become fully productive until they have reached the age of thirty. A mature tree produces about 50kg of nuts per year.

The American Cousin

The American (Black) Walnut is quite a different fellow. They are native to the US and occur wild throughout the eastern United States. However, they are not as well-loved as the ‘English’ variety, since they have the rather unsocial habit of emitting a chemical from their roots that inhibits, and eventually kills other plants in its vicinity.  Besides, they are incredibly hard to shuck. People report placing them on their driveways and driving the truck over them in order to crack their shells. Crows & co have picked up on this trick. The birds strategically place nuts in the flow of traffic (e.g. at stoplights) in order to enlist our help in cracking the nuts.

Foraging

In a good year, a mature walnut tree is laden with nuts, which begin to fall in late September/early October, depending on your growing zone.

The nuts are covered by a hard, green hull that is exceedingly difficult to remove and besides, will stain your hands, clothes, and work surface.  Wear gloves, if you don’t want your hands to look like you have been chain-smoking. It is best to harvest the nuts when they are fully ripe, at which point the green cortex will split open to reveal the nut inside, or sometimes it disintegrates into a black mush, leaving the nut behind.

Remove the black stuff as much as possible. It is very high in tannin and can affect the quality of the nut inside. Once you have removed the outer cortex wash the nuts. Put them into a bucket of water. This will naturally separate the good ones from the rotten ones. Bad walnuts tend to float, while the good ones will sink.

After washing the nuts, you can either shuck them or dry and store them for later use. If dried and stored properly, walnuts can keep for a year. Shucking exposes them to oxygen, which will cause them to turn rancid more quickly, due to their high levels of unsaturated (as well as saturated) fats. Keep the nuts in a cool and dark place where there is no danger of worms or vermin looking for a free lunch.

American Walnuts are much harder to crack than English walnuts. It is said that soaking them in water for 8 hours prior to cracking makes the job much easier. For English Walnuts, this is not necessary. They readily succumb to the persuasive powers of an ordinary nutcracker. Black Walnuts need a more forceful treatment.

Walnuts are very rich in oil – 2 kg of nuts will yield about one liter of oil. which is considered a delicacy. It is not so easy to obtain from your foraged nuts, though. Native Americans are said to have boiled the nuts to extract the oil. But this also destroys some of their nutrients.

Walnut oil has a delicious nutty flavor and is excellent in salad dressings or home backing to impart a delicate nutty flavor.

Most of all, forager appreciate walnuts for their delicious ‘meat’, which can be used in both sweet and savory dishes. (see recipes below)

Medicinal uses

The soft kernel on the half-shell vaguely resembles a brain, surrounded by the protective cover of the cranium. The ancients took this likeness to mean that the nut must be good for the brain.  (according to the doctrine of signatures). Scientists have confirmed that walnuts are indeed beneficial for the brain. This is due to their nutrient content, and especially the omega-3 fatty acids (of which walnuts are a rich source). Omega-3 fatty acids support the body when it comes to dealing with stress and is said to help alleviate depression. (see https://www.health.harvard.edu/blog/omega-3-fatty-acids-for-mood-disorders-2018080314414)

Native Americans have used various parts of the tree, not just for food, but also as medicine. The leaves and root bark was used in anti-parasitic preparations and to treat skin diseases. The root bark is very astringent and makes a good anti-inflammatory wash that can be applied to herpes, eczema, and scrofula. Taken internally, it stops diarrhea, stays the flux, and dries up the flow of milk in nursing mothers.

Dyeing

The leaves repel insects and can be used as an ad hoc insecticide. The hulls, husks, leaves, and bark are all used as vegetable dyes to yield various colors ranging from yellow to dark brown or black.

Paints

The oil is drying and can be used in oil paints as an alternative to Linseed oil. Recently, powdered shells have been incorporated into new types of ‘designer paints’ to produce interesting textures or in-floor paints, to produce an anti-skidding effect.

walnuts

Recipes

Pickled Walnuts

If you want to pickle walnuts, you have to pick them while they are still green and hanging in the tree. They have to be in an unripe state so that the inner shell is still soft and hasn’t turned woody yet. Typically, they should be picked in June.

Prepare a brine: 6oz salt to 1 quart of water.

With the help of a long needle poke the walnuts all over (don’t remove the green hulls) and cover with the brine. Steep for about 1 week.

Drain, and repeat: cover with fresh brine for another week.

Drain again. Spread the walnuts on a tray and let the sun dry them. Turn them from time to time.

When the walnuts are dry and have turned black, fill them into pickling jars. (Kilner jars, mason jars))

Prepare a spiced vinegar with:

  • 1oz mixed peppercorns
  • 1oz allspice
  • ¾ inch ginger root (fresh)

Add some dried chilies or coriander seeds, if you like. Lightly crush the spices and place them into a muslin bag. Simmer the bag in the malt vinegar for 10 minutes. Then let the vinegar cool down before removing the spices. Pour the vinegar over the walnuts and make sure the liquid covers them. Close the jar tightly. Macerate for 6 – 8 weeks before tasting them.

Stuffing

Walnuts make an excellent stuffing for mushroom, marrows, or puff pastry parcels.

Ingredients:

  • 12 medium-size mushrooms caps
  • 1 tbs. olive oil
  • 1 tbs. butter
  • ½ cup finely chopped onion
  • 2 tbs. coarsely chopped walnuts
  • 1 garlic clove, peeled and minced
  • 5 ounces frozen spinach, thoroughly defrosted and squeezed to remove most of the liquid
  • 1 oz feta cheese, crumbled
  • 1 oz Gruyere cheese, crumbled
  • 2 tbs minced fresh dill
  • salt and freshly ground black pepper and nutmeg to taste

Method:

Preheat oven to 400° F. Clean the mushrooms and remove the stems.  In a small skillet, heat the olive oil and butter. Add the onion and cook over medium heat, cover and sauté until soft.

Add walnuts and cook for another minute. Add the spinach and stir continuously for about 5 minutes. Take off the heat and cool slightly. Stir in cheeses, dill, nutmeg, and salt and pepper, to taste.

In an oven-proof pan arrange the mushrooms, cavity side up. Plop a wallop of the spinach/walnut mixture into each mushroom cap and bake for 8 to 10 minutes or until the filling turns brown and the mushrooms are thoroughly heated.

Walnut Liqueur

In Italy and France, walnut liqueur is considered a regional specialty. ‘Nocino’ in Italian –  although there are many versions of the ‘original’ recipe. The idea is simple: macerate green, unripe walnuts in a blend of clear alcohol, (e.g. grain alcohol), and syrup.

Method

In June, when the Walnuts are still green and soft inside (traditionally on St. John’s Day=Midsummer), pick your nuts straight from the tree. Wash and quarter the nuts.

Remember to wear gloves!

Fill a large jar with the nuts and add some spices, such as a couple of cinnamon sticks and a few cloves and perhaps a vanilla bean. Chop up an organic, untreated lemon (or orange, if you prefer) and add to the mixture. Pour in about 1 ½ pound of sugar and cover with 3 liters of grain alcohol. Close the lid tightly and steep for about 6 weeks. Keep in a warm dark place.

Test the liquid and adjust to suit your taste. Strain through filter paper and bottle. Store in a cool place.

Green Walnuts preserved in Syrup – from Mrs. Grieves – A Modern Herbal

‘Take as many green Walnuts as you please, about the middle of July, try them all with a pin, if it goes easily through them they are fit for your purpose;

lay them in Water for nine days, washing and shifting them Morning and Night;

then boil them in water until they be a little Soft, lay them to drain;

then pierce them through with a Wooden Sciver, and in the hole put a Clove, and in some a bit of Cinnamon, and in some the rind of a Citron Candi’d:

then take the weight of your Nuts in Sugar, or a little more; make it into a syrup, in which boil your Nuts (skimming them) till they be tender;

then put them up in Gally potts, and cover them close.

When you lay them to drain, wipe them with a Course cloth to take off a thin green Skin. They are Cordial and Stomachal.’

– (From The Family Physician, ‘by Geo. Hartman, Phylo Chymist, who liv’d and Travell’d with the Honourable Sir Kenelm Digby, in several parts of Europe the space of Seven Years till he died.’)

Walnuts are incredibly versatile – even if they are not the star ingredient, they never fail to give a dish a refining note. I sprinkle them on salads or use them instead of pine nuts in a pesto blend. They are also fabulous in desserts and cakes.

Caution:

People who are allergic to nuts should stay away from walnuts and all products derived from them or containing them. Likewise, people who are scared of calories should treat this nut with respect. However, replacing some of your normal dietary fat with walnut oil can be a very wise choice as walnut oil has an excellent nutritional profile and can help to fight free radicals while lowering cholesterol levels. Walnuts are a good source of omega-3 and omega-6 fatty acids.

Always wear gloves when handling walnuts – especially as long as they are still green. And leave some for the wildlife – it is an important source of food to carry them through the winter.

wildlife

How To Make Rose-Hip Syrup

How To Make Rose-Hip Syrup

Making Rose hip Syrup

Rose hips are a funny fruit: Gourd shaped little piglets, wafting in the wind! The bright red berries sprinkle the landscape with a glorious, shiny dash of color. In their early stages, rose hips are rock hard and difficult to pick. The coat is thin, the fruit flesh meager, and their bellies are filled with an abundance of hard little seeds that are embedded in fine ‘hair. Perhaps, this hair is just as irritating to a bird’s throat as it is to a human one. Not so long ago, schoolchildren tormented each other by using it as ‘itching powder’. The best variety to use for this purpose is the Beach Rose, Rosa rugosa, with its big, fat squash-shaped hips. It yields an abundance of fluffy stuff.

I can never resist the temptation of biting into the first rose hips that turn red in September, even though I know they are still hard and very sour. Inevitably, I end up spitting out the seeds and trying to get rid of the little hairs.

Rosehips are best picked after the first frost when their outer cortex turns soft and sticky. At this point, they can be gathered without a struggle and are much easier to process, too. But depending on your climate, that may come late, by which time there are not so many hips left, or they lost their appealing looks. If you have plenty of space in the freezer, you can also pick them when they are fully ripe and then place them into the freezer where they can soften and you can use them when you are ready for a day of action.

My favorite way to preserve them is to turn them into syrup or conserves, which make formidable Vitamin C bombs – much needed to boost the immune system during the winter.

When picking wild herbs, or fruit, I always ask the tree, bush, or plant for permission and explain why I need their help. I tell them that I need them to heal and nourish my friends and family and that I would very much appreciate their cooperation. I find that a plant addressed in that way will be much more cooperative and that I will be much more mindful as I pluck their leaves, fruit, or flowers.

It’s not exactly ‘news’ that Rose bushes have sharp little thorns. Those foolish enough to approach roses ‘mindlessly’ are sure to carry forth the battle scars. The rose will win, even if you manage to get a few hips. So, a mindful attitude helps, a lot!

If it tries to tuck at my clothes or rip my collecting bag I gently remind it that I am not doing any harm. Usually, we come to an arrangement. For example, I let it hold my bag since it tries to get it anyway. That leaves my hands free to pull off the hips. Wearing gloves helps.

When I first started making rosehip syrup I went through the painstaking process of cutting off each hip’s tail and snout, halving them, and scooping out the seeds and hair before putting them into the pot. This can be a very drawn-out and fiddly process! In fact, it was a pain in the neck (literally!) But then I found a better way! All you nee are frost-softened hips.

add mushed rose hips to boiling water

Simply wash and clean the hips (top and tail them) and put them into a grinder or processor with a little bit of water and grind them to a pulp. Then transfer the mush straight into a pot of boiling water (leave enough space for the mashed rose hips). This saves hours of labor and, what’s more, it also saves the most vital constituent of the rosehip, the vitamin C. There is an enzyme in the hips that is triggered by exposure to oxygen. One triggered, it activates an oxidation process that destroys vitamin C. Interestingly, the vitamin C loss from boiling the hips is lower than the potential loss from oxidation and, the boiling water kills the enzyme.

As long as the rose hips are not too hard they will mush up very easily. In no time, you will have the sticky goo of seeds and fruit pulp floating in the pot. Simmer gently for about 20 minutes. Then turn off the heat and allow to cool.

straining out rose hip solids
filtering rose hip liquid through cheese cloth

Once lukewarm, strain out all the solids and measure the liquid. To filter out all impurities, use a cheesecloth to filter the liquid after you have strained out the solid parts. Return the liquid to a (clean) pan and add a kilogram of sugar per liter of liquid. (Make sure you are using a large enough pan!) Stirring occasionally, let the sugar dissolve by itself for a while, before you return it to the heat. (This shortens the final simmering time considerably.)

Once the sugar has more or less dissolved, return the pan to the heat and simmer gently until all the sugar has dissolved completely. Meanwhile, sterilize your bottles. As soon as all the sugar is completely dissolved, fill the syrup into your prepared bottles, adding the juice of 1 lemon per liter of syrup. Top with a twist-off pop-up cap. Unopened, they will last as well, and as long as jams do, but once opened, they should be stored in the fridge.

bottled rosehip syrup

Pin It on Pinterest