
Nature Notes:
Welcome to the Sacred Earth website!

Hi there! Thanks for stopping by! My name is Kat Morgenstern, and I am delighted that you have found your way here!
I have created the Sacred Earth website as a forum for nature lovers of all stripes. Come and join me on a journey down the garden path, and off into the virtual woods, where we will explore, learn and discover all about the intertwining roots of nature and culture.
Imbolc Awakenings
Imbolc Reflections: The Return of the Light and the Stirring of Life
Winter is still with us, though it has entered a moody and changeable phase. One day it is frosty, stormy, and inhospitable; a few days later, the sun pops out to tease us with warmth and brightness. And yet, despite winter’s lingering grip, there is one unmistakable sign that something has shifted: the days are noticeably longer now. Light is returning, minute by minute, almost imperceptibly, but with unstoppable determination.
Imbolc marks this subtle turning point of the year. At the beginning of February, it stands midway between the Winter Solstice and the Spring Equinox, heralding the first stirrings of new life, the breaking of the waters. In nature, the snow and ice begins to thaw.
Traditionally associated with Brighid, the Maiden Goddess of light, fire, poetry, and healing, Imbolc celebrates the increasing warmth of the sun and the promise of renewal and fertility of the Earth. Each passing day brings a few more precious minutes of daylight as the sun climbs higher in the sky.
To be sure, it is still winter. Frost may still coat the ground, and cold winds still remind us that the season has not yet released its hold. But if you look closely, signs of awakening are everywhere. Buds swell on bare branches, full of energy and intent. Beneath the soil, last season’s seeds soak up the moisture, preparing for germination. The sap begins to gurgle and rise again. The wheel of the seasons is turning, even if the movement is slow and largely unseen.
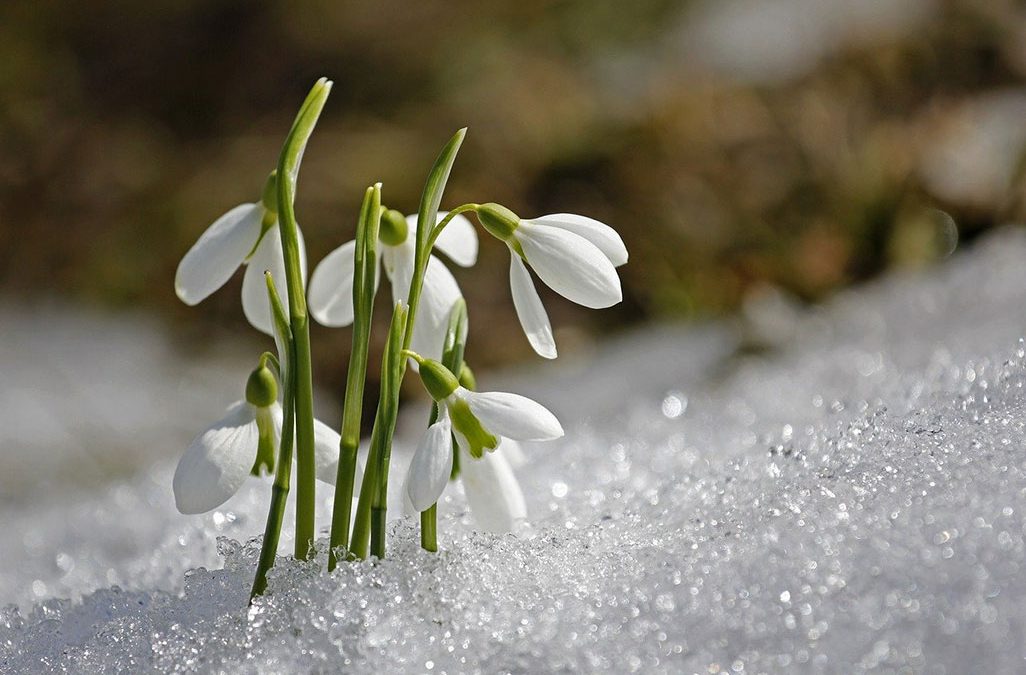
Some plants announce this change bravely. Snowdrops pierce frozen ground, their white bells nodding gently above leaf litter and snow. Winter aconite flashes sudden gold in dark corners of the garden. Dwarf irises and other early bloomers defy the odds, reminding us that life does not wait for perfect conditions. The life force stirs deep within the Earth, and within ourselves.
Imbolc, Candlemas, and the Theme of Purification
Imbolc is also known as Candlemas in the Christian calendar, a festival of light, cleansing, and spiritual preparation. Traditionally, this was a time of purification — both inward and outward — preparing body and soul for the coming cycle of growth.
In the past, this marked the approach of Lent, a period of fasting and abstinence. Heavy winter foods were gradually reduced, allowing the body to cleanse itself and regain vitality after the long months of cold and scarcity. This rhythm mirrored nature’s own process: a shedding of excess, a clearing of space, a readiness for renewal.
Symbolically, Imbolc invites us to do the same. To let go of what no longer serves us. To simplify, to clear, and to make room — not through force, but through gentle attention and care.
Plants of Imbolc: Messengers of the Light
Imbolc is deeply connected with plants that signify resilience, purity, and renewal. These plants can be braided into the season as symbolic and practical points of connection.
Snowdrop (Galanthus nivalis)
A classic plant of Imbolc, snowdrops symbolise hope, purity, and determination. Their appearance amidst frost and snow marks the first visible sign that winter’s harsh grip is waning.
Hazel (Corylus avellana)
Associated with wisdom, inspiration, and poetic insight, hazel is sacred to Brighid. Hasel is a transmitter of cosmic energies and symbolizes inner knowing and the spark of creative vision that emerges during this liminal time.
Birch (Betula spp.)
A tree of beginnings and renewal, birch is often one of the first trees to leaf out after winter. It symbolises purification, fresh starts, and the clearing out of the old and unneeded.
Almond (Prunus dulces)
In Mediterranean climates, the Almond tree is an early harbinger of spring. Its pinkish white flowers adorn the still barren landscape, a promise of abundance and fecundity to come.
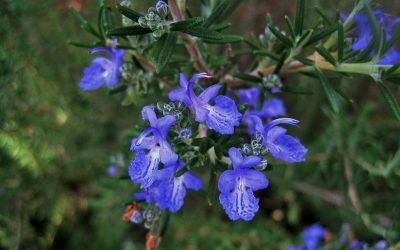
Rosemary (Salvia rosmarinus)
An evergreen herb traditionally associated with memory, clarity, and protection, rosemary bridges winter and spring. Its resilience reflects the continuity of life even during dormancy.
Imbolc as a Time of Vision and Intention
Imbolc is a threshold — a liminal space between what has been and what is yet to come. At this time, a space opens allowing us to pause and look inward. To reflect honestly on our strengths and weaknesses, our virtues and our shadows. To ask ourselves difficult but necessary questions.
What nourishment does your soul need now?
What intentions are quietly forming within you?
How do you wish to give back to life as the year unfolds?
Are you walking your talk?
Imbolc is a time for purification, vows, affirmations, and quiet commitments rather than grand declarations. Seeds — literal or symbolic — are selected, setting intentions. Tend to your inner flame and protect it from harsh winds and careless neglect.
Growth begins long before it becomes visible. The light is still dim, but it is growing steadily. Tend it gently. Soon the sun will rise higher, its warmth growing stronger with each passing day. And when it does, life — both within and without — will surge to fullness once more.
Current issue

I love the winter

I love the winter, calm and still,
when the life force withdraws
and sleeps among the roots.
I love the barren, naked trees—
fragile branching silhouettes,
transparent filigree against the sky.
I love the birds
Flocking together,
dancing through the air
seeking shelter in the shrubs.
I love the scarlet rosehips,
A splash of colour in the hedges
when all is grey-on-grey.

I love the mud beneath my feet
as it tries to pull off my boots,
and the puddles in the furrows,
mirroring the sky.
I love the remnants of snow,
clinging to the grass,
like crystalline sculptures
of frozen spiderwebs.

I love the leaden clouds
draped across the evening sky
And the glowing winter sun,
heavenly fire, igniting the horizon.
I love the winter’s timelessness,
frozen in eternity.
But if you listen carefully,
you can hear the murmur of thaw.
Plant Profile:

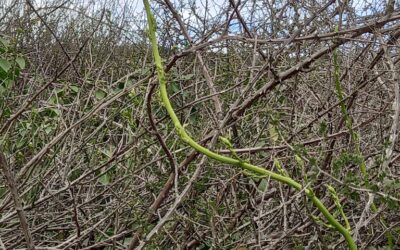
Birch (Betula sp.)
Description:
The graceful birch tree has always held a special place in our hearts and minds. Traditionally she was perceived as a youthful Goddess of love and light. Yet, her soft feminine and almost fragile appearance belie her hardy nature. Birch is a tree of northern latitudes and unforgiving climates – common from Siberia to Scandinavia, Scotland, and England as well as North America, the Himalayas, China, Japan, and North Korea. Some species have traveled south, to the more temperate regions of the Mediterranean and beyond – almost all the way to the equator. But in the southernmost regions of her range, she prefers mountainous terrain. Humble and undemanding in her soil requirements, she will even make herself at home in sandy or stony ground. Yet, her special affinity lies with water and her preferred habitat is boggy terrain. Birch is a pioneer tree, who happily settles where other trees fear to set root. Over time she ‘cultivates’ such terrain, making it more arable and preparing it for other species to follow in her steps.
Her silver-white bark gives her a striking appearance. In youth, the papery bark peels off easily. It is thin, yet tough, and in the past, has in fact served as paper. As the tree matures the bark begins to form a layer of cork that provides excellent insulation and protects her against the cold. The young twigs and branches are reddish brown and very elastic. Early in the year, she is one of the first trees to put on her spring-gown of luminous and delicate lime-green leaves, triangular or heart-shaped in appearance and conspicuously serrated margins. Early in the spring, when the leaves first unfold, they feel sticky and are covered by a resinous aromatic substance with a balsamic scent.
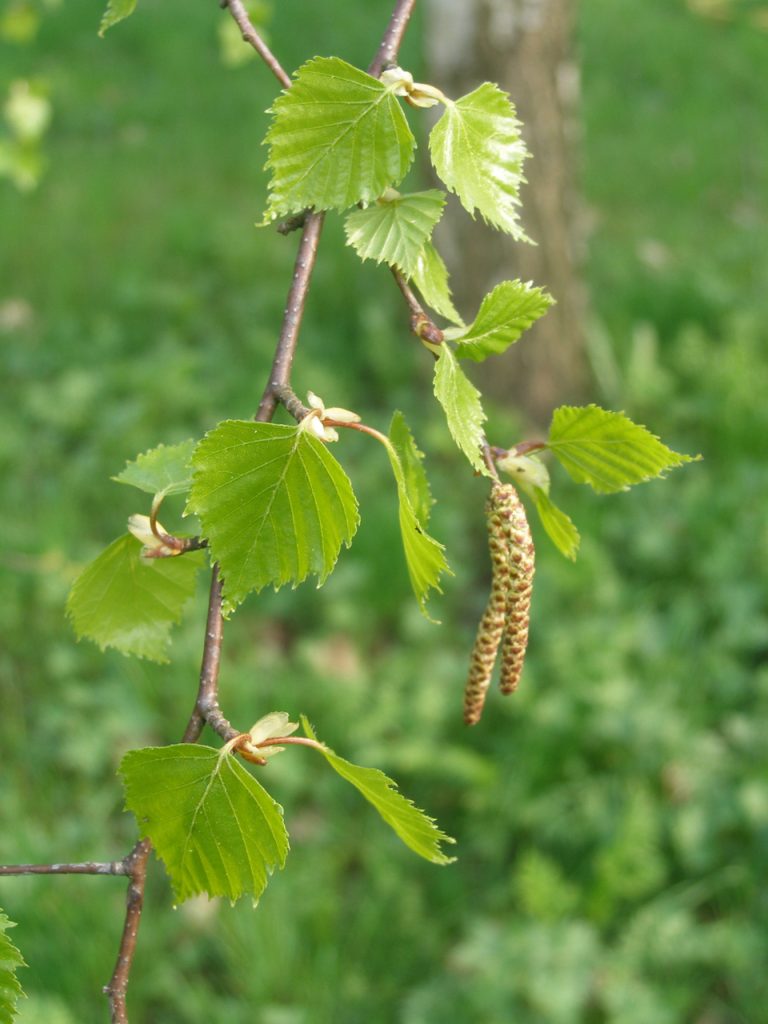 The flowers are known as catkins. Both male and female flowers are present on the same tree, though they develop separately. The male flowers begin to develop in the summer, endure the winter and wait until the female flowers appear in spring. They court the wind as pollinator and distributor of their tiny winged seeds, which are so light that they may be carried for several hundred miles.
Birch trees can reach a height of up to 30m. They reach maturity after about 50 years but can live to about one hundred years.
HISTORY, LORE AND MAGICAL USES
The people of northern Europe have long been very fond of this beautiful, slender tree with its white, shining stem and graciously flowing branches. To them, it evoked the image of a beautiful young woman, which they identified with Freya or Frigga, their Goddess of love and fertility. The Celts, who were equally fond of Birches, identified her with the virgin Goddess Bridha or Brigid. Etymologically the name, ‘Birch’, derives from the Sanskrit ‘bhura’, meaning ‘shining tree’ – no doubt an allusion to the striking white bark and bright, golden autumn cloak.
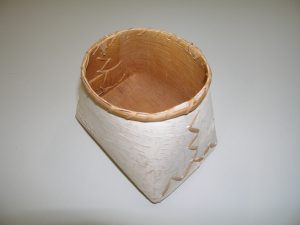
In Siberia, Birch was regarded as the sacred world-tree and presented a bridge between this world and the realm of spirits and Gods. At first this may seem an odd choice, given the modest statue and strength of an average Birch tree. But it may be at least partly explained by the fact that in those remote regions Birch frequently was the commonest, if not the only tree around. Another reason may have been its universal usefulness: Birch provides medicine and nourishment and its bark and wood can be fashioned into a large number of utensils, from birch bark containers to coverings for lodges and even garments and shoes.
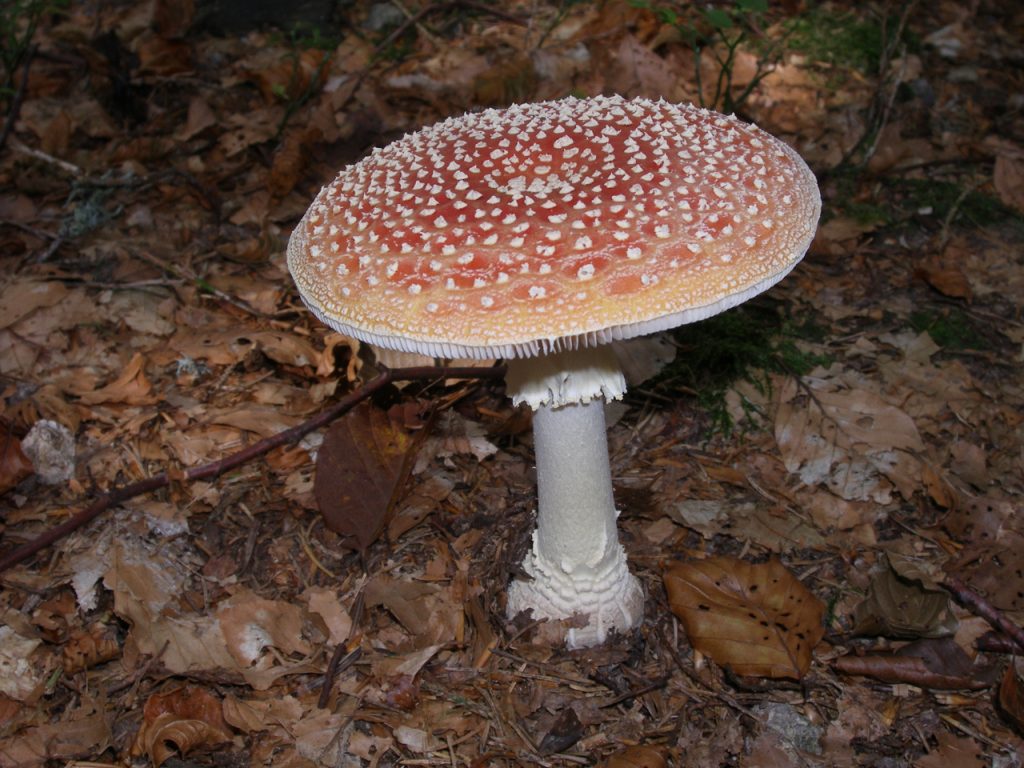
The sap is rich in nutrients and the inner bark can be ground into a flour to make ‘cakes’. This is considered famine food, the last resort when nothing else is available. But deer, and most importantly, reindeer relish this inner bark, which is their life-saving winter forage. In turn, the nomads depend on the reindeer, the sacred center of their world which provided them with almost all the essential gifts that made life possible in these inhospitable regions. The reindeer was a spirit guide and totem animal – and it also showed the people where to find their most important sacrament, the Fly Agaric. This conspicuous toadstool with its bright red cap and white dots atop forms a symbiotic relationship with Birch and are often found growing near them. Reindeer love this toadstool as much as the Siberian shamans do, who consider them as a sacred food of the Gods. They partook of it on special occasions, while honoring the Gods in ecstatic celebrations, or prior to going on a spiritual journey to ask for help and advice from the Gods. Thus, the Fly Agaric and the Birch tree have become closely associated and both are shrouded in mystery.
Some legends portrait Birch as a manifestation of the Goddess, who offers her milk to the shaman as an elixir of life, and some scholars regard the sacred mushroom as the breast of the Goddess from whence her milk flowed – and perhaps even the source of the fabled Soma, the sacred elixir of life and nectar of the Gods.
As one of the first trees to put on her spring-dress it is only natural that the Birch has always been associated with the life-giving power and has featured prominently in fertility rites and magic. Birch signals the arrival of spring and traditionally farmers observed her progress to determine when to sow their wheat.
In pre-Christian times, Birch played an important role in Beltain celebrations, which are traditionally held on the eve of May 1st. Throughout Europe, faint echoes of this pagan festival have survived to this day as rural May-Day festivals and pageantries. May-Day is the celebration of spring, of love, life, and fertility. On this day, the whole community, or sometimes just the young lads and lasses, go out into the woods to fetch the ‘May-tree’, which more often than not, is a Birch sapling. Much fanfare accompanies the procession upon their return to the village. The tree is decorated with colorful ribbons, shortbreads, and other goodies and is fixed to the top of a pole which is erected on the village square. In the old days, the raucous feast went on all day and often through the night, with much eating, drinking, singing, dancing and general merrymaking – much to the dismay of the church authorities. They tried hard to suppress these quaint old pagan celebrations but in vain. The dance around the Maypole is still popular in many rural areas, though modern celebrations are tame compared to those of the past and nowadays have been sanctioned by the church.
The fertility and life-giving powers of the May-tree Birch served as a ‘village charm’. A procession of singing and dancing folks carried it from house to house to bestow blessings and protection to all the village folk, their and their animals. Later, the custom evolved into a form of flogging, often referred to as ‘quickening’, which was based on the belief that the mere touch of the Birch twigs would bestow luck and fertility to those who came in contact with them. Thus the men of the village would take it upon themselves to ‘bless’ the women with these fertilizing powers by hitting them with birch twigs. All female inhabitants, women, girls, cattle and farm animals, all received the same treatment. Eventually, though, the custom changed and only children, mentally retarded people, and delinquents were given the Birch twig treatment, which was supposed to drive out the ‘evil spirits’ that evidently possessed them. Of these, the practice of chastising children possessed with the ‘demons of disobedience’ with Birch switches, has persisted the longest.
Birch regarded as a protective tree, able to ward off all kinds of daemons and witches. In a milder form of exorcism than that described above, Birch twigs were often pinned above entrances in house and barn to protect against and avert the evil-doings of witches and demons and to undo their spells and curses – especially those that caused impotence or made the flow of milk dry up.
In magical folk medicine, Birch was associated with ‘transfer magic’, and used to alleviate the pain of rheumatism. Three days before the new moon the sufferer had to go and plead with the Birch tree to relieve him from his pains. Certain prayers were solemnly recited and a wreath was wound by tying knots into the bendy birch twigs. It was believed that in this manner the painful knots of arthritis and rheumatism were transferred to the Birch tree, while the patient would find his limbs nimble and bendy, like Birch twigs.
GENERAL USES
Birchwood is light and rots easily, which makes it rather useless for construction work. However, the bark is extremely water resistant, a quality, which Native Americans have long put to use for waterproofing the roofs of their huts. They also fashioned special lightweight canoes as well as various domestic items, such as pots for collecting sap, or cribs to carry babies, shoes, lampshades and even toys from this versatile bark. In Europe, the twigs have mainly been used for thatching and wattle work or for making brooms. The brush ends of brooms, including those of witches’ brooms, were also partly made with Birch twigs.
In early spring the sugary sap rises in the stem. To tap it much the same technique is used as for tapping Maple syrup: a hole is drilled into the stem (1/2 cm wide and 3 cm deep), and a glass tube is inserted. One should not take more than 2-3 liters at a time and only ‘milk’ the tree once every two years. The hole must be sealed with special tree wax to protect it from bleeding to death. Ordinary candle wax is not sufficient, as it will just get pushed out again. This is best left to an experienced person as otherwise, the tree may suffer great damage or it may even kill it.
Birch trees also yield a resinous substance called ‘Birch tar’, which can be extracted from the bark. It is very rich in tannins and is used for curing leather. It makes an effective (and smelly) insect repellent and can also be used as a balsamic healing agent for all manner of skin sores including insect bites.
The inner bark is rich in sugars, oil and even contains Vitamin C. It provides welcome winter forage for deer and other rodents when everything else is covered under a blanket of snow. Native Americans used to prepare a type of flour from the inner bark, which could be used for baking. Birch is not often utilized as firewood, as it burns too quickly, but the bark makes excellent kindling and will even burn when wet. The smoke is a powerful disinfectant and when burnt as incense it ‘smoke off’ infectious micro-organisms. Native Americans often burnt thin pieces of birch bark in their ‘medicine tepees’, where the sick were isolated, in order to purify the air and kill off germs.
MEDICINAL USES
PARTS USED: Leaves, inner bark, sap
HARVEST TIMES: Spring
CONSTITUENTS:
Leaves: flavonoids, saponins, volatile oil, tannin, resin
Bark: betulin (birch camphor), glycoside, volatile oil, tannin, bitter substances, resin
Sap: Sugar, organic acids, amino acids
ACTIONS: diuretic, bitter, slightly astringent
Birch leaves are very useful for their diuretic properties and can be used to help in the treatment of rheumatism, arthritis and gouty conditions. They also have a reputation for dissolving stones. In Russia, an old folk remedy for rheumatism was to completely cover the patient with Birch leaves, which resulted in a cleansing sweat and subsequent relief. The diuretic action also helps to relieve oedematous conditions and urine retention.
CULPEPER SAYS…
‘It is a tree of Venus. The juice of the leaves, while they are young, or the distilled water of them, or the water that comes from the tree being bored with an auger, and distilled afterward; any of these being drunk for some days together is available to the stone in the kidneys and bladder and is good also to wash sore mouths.’
A decoction of the bark can be used as a wash for impurities of the skin. Birch tar is often used as an ingredient of ointments for psoriasis and eczema.
The sap is a wholesome elixir that can be taken as a spring tonic. However, it has a tendency to ferment easily and is thus not suitable for long-term storage. It should be kept in a dark bottle and stored in the fridge. Adding some Cloves and a piece of Cinnamon also helps to prevent fermentation.
A compound tincture of Birch leaves can be used as a tonic hair rinse to promote healthy growth of hair.
- 2 handfuls of Birch leaves
- 1 spoonful of Arnica flowers
- 1 spoonful of Nettle roots
- 2 spoonfuls of Nettle leaves
- 4 Cloves
Cover with 70% alcohol, steep for 3 weeks, strain and bottle. Massage into the scalp and hair as a conditioner.
Or, make a strong infusion with the leaves and add 1 part apple cider vinegar.
Native Americans prepared a mushy paste by boiling and pounding the bark so it could be spread on inflammatory skin conditions, ulcers cuts and wounds. This reduces swellings and prevents infection. They also extracted oil by boiling the wood and bark. It is very effective in fighting fungal and parasitic skin conditions.
The North American species are different from the European White Birch. Their bark tends to be darker and has a distinct wintergreen flavor. In spring,
New Englanders enjoy a type of ‘root beer’ made from the twigs and sap, which apparently is very powerful. Euell Gibbons gives the following instructions:
“Measure 4 quarts of finely cut twigs of sweet birch into a bottom of a 5-gallon crock. In a large kettle, stir 1 gallon of honey into 4 gallons of birch sap and boil this mixture for 10 minutes, then pour over the chopped twigs. When cool, strain to remove the now expended twigs and return the liquid to the crock. Spread 1 cake of soft yeast on a slice of toasted rye bread and float this on top of the beer. Cover with a cloth and let it ferment until the cloudiness just starts to settle. This will usually take about a week, but it depends somewhat on the temperature. Bottle the beer and cap tightly. Store in a dark place, and serve it ice cold before meals after the weather gets hot.” He also says, “Don’t’ have more than a couple of glasses of this beer as it has a ‘kick like a mule'”.
More articles:
Plant Profile: Poppy (Papaver somniferum)
The story of the opium poppy starts at the dawn of history and takes us on a journey through history, mythology, folk magic and finally, to its modern medicinal use.

Foraging: Evening Primrose (Oenothera biennis)
Evening Primrose is a conspicuous and frequently encountered herb, but did you know that every part of it is edible?
Foraging Wild Asparagus
Early in the spring, one of nature’s most delightful seasonal delicacies is sending up its tender shoots—wild asparagus.
Rosemary – Rosmarinus officinalis
Most of us know this woody, aromatic bush as a culinary herb, but in fact, Rosemary is so much more than that. It has some quite remarkable properties that are well worth remembering. As a kitchen herb, Rosemary is an old stand-by: Rosemary potatoes, Rosemary chicken,...
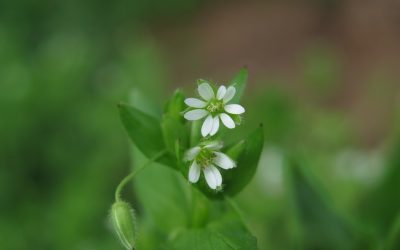
Foraging Chickweed
Chickweed is a little sprawling herb with heart-shaped leaves and star-shaped flowers that belongs to the Pink family. Gardeners hate it.

Making Birdseed Feeders
During the winter, birds don’t always find enough food. Learn how to make simple birdseed feeders with very few materials, in next to no time

Preserving the Harvest (1)
This article is about various methods to preserve the harvest. Making your own pickles and preserves, jams and chutneys, liqueurs and canned veggies is a great way to celebrate the harvest
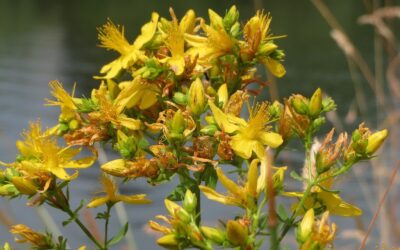
Plant Profile: St. John’s Wort
This plant profile of St. John’s Wort tells the stories, traditions, and medicinal uses of St John’s Wort.
Gardening Jobs in July
This is the time of the year that every gardener is waiting for! The garden is in its prime. Everything is grown, flowering and fruiting, and it is a sheer joy to be out there enjoying nature’s bounty.

Gardening Jobs in May
What gardening jobs are there to do in May? Actually, there are plenty. May is one of the busiest gardening months. Sowing, planting, weeding, maintenance and more – there is plenty to do.

Gardening Jobs for March
What gardening jobs are there to do in March? This is a quick guide to what to do and sow in the garden in March.

Gardening Jobs in February
Even as early as February, there are things you can do to kick off the gardening season and get a nice head start.